This page updated 11 Jan 2022
This article describes one of my example Templates for Online Repository Assistant (ORA). The other example Templates can be found in the index of Example Templates. Other articles in my ORA Section cover various topics about using the software. The "How it Works" section below includes links to articles describing the ORA features used in these Templates.
The set of Templates described here are designed to create Source definitions for Newspapers.com clippings – obituaries or newspaper items – in TMG. These Templates are designed to work with "splitter" style sources, where a new Source Definition is created for each clipping. In addition, there is a Text Template designed to produce a filename for the image of the item when it saved, and a separate Text Template to format the subject's surname when used by the other Templates.
The Templates are designed to work with Newspapers.com clippings, but could easily be adapted to work with other Collections that are used with "splitter" style sources. I have not tested them with other genealogy programs, but they could no doubt be adapted to them as well, or at least illustrate techniques useful for other applications.
Filename Template:
Obituary Template:
Clipping Template:
The Source Definition Templates are Auto Type, intended for use with TMG. The filename Template is a Text Template, which can be used with any application. The surname Template is a Text Template, designed to be used with the obituary and filename Templates.
In TMG, open a Tag Entry screen for a Tag in which you intend to cite the new Source.
In your browser, navigate to the newspaper page containing the item in Newspapers.com for which the Source is being created. In the OraPanel, click the Auto Type button for an obituary or a news clipping, as the case may be. The Template opens a Citation screen, changes that screen to the "New" mode, and creates the Source Definition in that screen. After verifying that the text entered is correct, close the Citation screen and the new Source is created.
When saving the image, copy the filename from the OraPanel, then save the image in the normal way, pasting the filename into the File Save dialog box when it opens.
The set of Templates includes two Text Templates. One cleans up various issues with the way the name of the subject of an obituary may be recorded, for use by the obituary and filename Templates. The other creates the filename to be used when an image of the item is saved. Two Auto Type Templates create the Source Definition for the obituaries and newspaper clippings respectively. This discussion will start with the Text Template to process the name of the subject of an obituary.
Name Cleanup Text Template:
The heading of this Template must be entered as "Name" in order for it to be used in the filename and obituary Templates. If another label is used the "Name" Variables in those Templates must be changed accordingly.
Obituaries "clipped" by Newspaper.com's automated system contain a field labeled Name for the name of the subject. Clippings created by users do not include a Name field, but do include a Clip Title field containing whatever the user entered, which for obituaries often starts with the name of the subject. If there is no existing clipping, you can create one yourself, which ORA will recognize after you refresh the OraPanel. The template starts with a term that checks whether the Name field is present, and if not assigns the contents of the Clip Title field to the Name Variable:
<[?:Name]|[=Name:[Clip Title]]>
This segment uses the Value Test Variable, placed within Alternates Conditionals, to see whether there is content in the Name field. If there is, the Conditional is satisfied, and no other action is taken. If not, an Assignment Variable places the contents of the Clip Title field in the Name Variable.
Since names of subjects sometimes appear in Newspapers.com in mixed case and sometimes in all upper case, the Template changes each name part to initial capitals only, with an Assignment Variable and the :capitalize Transform:
[=Name:[Name:capitalize]]
The Assignment Variable sets the "Name" field equal to itself but with case changed to initial capitals for each name part.
I find that obituary clippings often have "obituary" or "obit," and sometime other data, such as date of death, in the Name or Clip Title fields. The next segment of the Template is to remove those terms if they are present using the :replace Transform:
[=Name:[Name:replace: Obit.*:]]
This segments search for a space followed by the terms "obit" and if found replace it and any text that follows with nothing. The :replace Transform uses the regular expression feature, searching for the literal term " Obit" followed by zero or more characters, which is specified with the ".*" part of the expression. If the search terms are not found, no change is made.
In order for the results of a Template to be used by another Template it has to actually produce output. So the final step is create that output, is done by simply using a Variable to output the processed name:
[Name]
The output of a Text Template can only be used by another Text Template of a higher number, so this Template must be placed to the left of the filename Template described next. Also, during testing the result of any change to a Text Template is only available for testing in another Template after it has been evaluated by refreshing the OraPanel or moving to a different record.
Filename Text Template:
This Template generates a filename to be copied and pasted into a File Save dialog box when saving an image of the clipping.
The filename generated includes the path to the target folder so the user does not have to navigate to that folder manually. In keeping with my preferences, it includes the name of the newspaper and the issue date. If the item is a clipping as opposed to an obituary, it then adds the text entered by the user for the Source Abbreviation. If the item is an obituary, it enters the subject's name, surname first, and the text "obit".
The Template begins with the value of the "Name" field as cleaned up with the Template described above.
It removes any periods that may appear after initials, because I prefer not to include periods in filenames. This is done with the :replace Transform that searched for periods in the name, that may be after initials, prefixes or suffixes, and replaces them with nothing:
[=Name:[Name:replace:\.:]
The :replace period in the "search for" string is preceded by an escape character – a backslash – because the period has special meaning in the regular expression that is the default mode of the replace Transform.. The resulting name without the periods is then assigned to the Name field by the Assignment Variable. If no period is found no change is made.
Next the actual filename is assembled. First, the path to the folder where the image is to be stored is created with literal text. See my example Filename for details about how this can be done.
My preferred format for filenames for newspaper clippings starts with the date, the name of the newspaper, a hyphen, followed a brief description of the item. The first part is created from the Date field and the name of the newspaper from fields ORA captures from the record:
[Date:date:yyyy-mm-dd] [Paper] -
The Date field had a :date Transform to convert it to year, month, day format so the items sort by date in a list of files. This Transform is required because I have set a different format for general use of the Date field in the OraSettings page. That is followed by a space then the field with the name of the newspaper, then a space, hyphen, and another space as literal text.
Finally, a brief description of the item is added with this segment:
<[Abbreviation text]|<[Name:nameSurname], <[name:namePrefixraw] >[Name:nameGiven]<, [Name:nameSuffixraw]> obit>>
The entire segment is enclosed in Alternative Conditionals. The first term in that Conditional is the Variable for the Abbreviation text, which is generated by the Auto Type Template for clippings, as described below. If that Variable exists the Template "knows" the item is a clipping, so that text is added to the filename and the Template is completed. If the Abbreviation text Variable does not exist, the Template "knows" that the item is an obituary, and the second term of the Conditional comes into play to add the name of the subject.
This is done by using the [Name] variable created in the preceding Text Template and various versions of the :name part Transforms. The surname is placed first, followed by the literal characters for comma and space. This term is followed by terms for the prefix (Dr., Gen., etc.), the given name, and the suffix (Jr., Sr., II, etc.). The prefix and suffix terms are enclosed in Conditional brackets along with their associated spaces and comma so those characters are not output if the name parts do not exist in the record. The "raw" versions of the prefix and Suffix transforms are used because the regular versions "standardize" those items by adding periods in some cases, which I prefer not to include in filenames. Finally, the literal text "obit" is added at the end.
Auto Type Templates:
The Auto Type Templates are intended to generate a complete Source Definition in TMG, starting with an open Tag Entry screen. The Templates use the "Expanded" Citation screen, rather than the Source Definition screen, because the latter is a tabbed screen that requires changing tabs to enter the Comments Source Element. By using the expanded Citation screen a new Source can be created from a single data input screen in TMG, avoiding all the Control Sequences needed to navigate the tabs in the Tag Entry screen.
The Templates gather data from fields available in the OraPanel and format it to create output for each Source Element. When needed data items are not available the user is prompted to enter them manually. The methods used are explained for each Source Element below. When the two Templates require different methods, each is explained. The {tab} Control Sequences used to advance from field to field are included in the Templates at the end of this article, but are not shown in the following discussion for each segment.
For clippings the template uses the Assignment Variable to prompt the user to provide the text to be used in the Source "Abbreviation" field, the title and subtitle of the article being clipped:
| Obituary Template | Clipping Template |
none required |
[==:Abbreviation Text] |
| Only the variable text of the abbreviation is entered; the standard prefix "newsclip-" that I use is supplied by the Template.
If there is no sub-title, that Variable is left empty by pressing the enter key, or clicking OK, without entering anything in the prompt. |
Both Templates open the Citation screen in TMG with the Control Sequence for the F4 key. That screen opens with the focus on the Source Number field. The Control Sequence for the shift-tab combination tabs "backwards" to the "New" radio button. A literal space character selects that radio button and the focus advances to the Source Type drop-down list.
{F4}{SHIFT+TAB} {300}
It takes TMG a finite amount of time to change the Citation screen from the "Old" mode to the "New" mode, which requires re-drawing that screen. I find to get dependable results in selecting the Source Type with the following step I need to add a delay Control Sequence to give TMG time to catch up. I have found a 300 millisecond delay works on my system, but you may find a shorter delay works for you, or you may need a longer one.
The Source Type is selected from a drop-down list. Items on that list cannot be reliably selected by typing the name of the Source Type when there are several items that begin with the same terms, particularly when the names include spaces or other special characters. One method that has been found successful is to type a few letters of the beginning of the name, add a delay Control Sequence to let TMG find the first item starting with those characters, then type the same letters again to advance to the next item with the item with the same beginning characters, and repeat until the desired item is found.
I have several Source Types that begin with "news" so the text typed to find the correct one differs for the two Templates:
| Obituary Template | Clipping Template |
news{800}news{800}news |
news |
| Three attempts find the third "news" Source Type for obituaries. | The first "news" Source Type is used for clippings. |
To use this Template on another system you would need to change the characters typed to match the name of your Source Types, and the number of repeats, if any, to match the list of Source Types on your system. I found the 800 millisecond delay worked on my system to allow TMG to select each Source Type in turn, but you may find a shorter delay or longer one works best for you.
An alternate method is to be sure that the Source Types have unique names up to a point before the first space or special character. Doing so allows the Template to work by just typing in enough letters to uniquely select the desired Source Type.
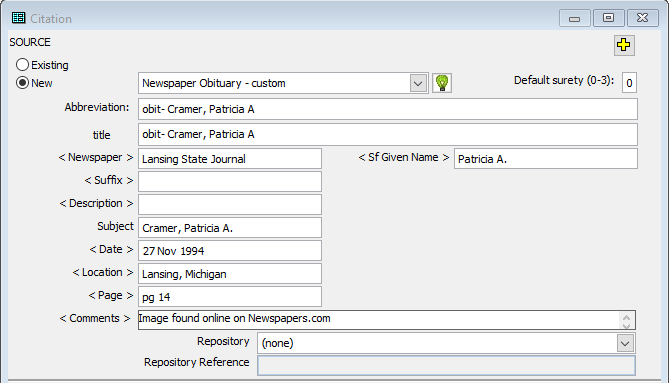
The formatting of the Source Abbreviation in TMG is totally a matter of personal preference. I prefer to start my obituary Source abbreviations with "obit- " so all my obituary Sources sort together in the Master Source List, followed by the name of the subject, surname first. For example:
obit- Cramer, Patricia A
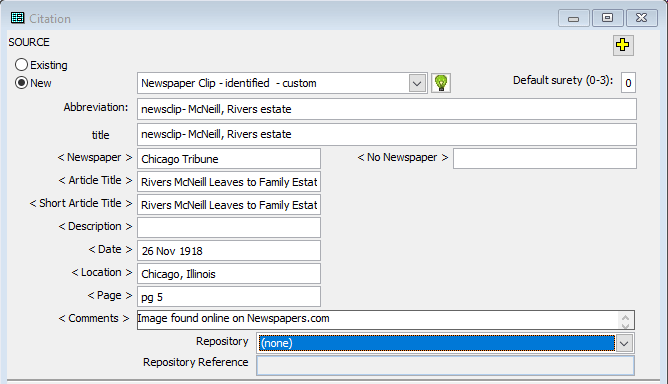
For the newsclip Source I prefer that the Abbreviation start with "newsclip-" followed by a brief description of the subject of the article. For example:
newsclip- McNeill, Rivers estate
Therefor the segment of the Template that produces the Source Abbreviation differs:
| Obituary Template | Clipping Template |
obit- [Name:nameSurname], <[name:namePrefix:replace:\.:] >[Name:nameGiven:replace:\.:]<, [Name:nameSuffix:replace:\.:]> |
newsclip- [Abbreviation] |
| With the exception of the literal text "obit- " at the beginning this is the same Template segment as described above for the Filename Template, except that the :replace Transform to remove any periods is placed within the individual terms because I want those periods included in other uses of the Name Variable below. |
The Title Source Element is not used in my newspaper Source Types, so I repeat the same text with the same Template segment for that Source Element.
The name of the newspaper is entered with the [Paper] variable:
[Paper]My two newspaper Source Types differ in what is entered next. The one used for obituaries requires the name of the subject, while the one used for clippings requires the title and short title of the article. Those are produced with these segments:
| Obituary Template | Clipping Template |
[Name:nameSurname], <[name:namePrefix] >[Name:nameGiven:replace\b([a-z]) [ ]:$1.]<, [Name:nameSuffix]> |
[Article-Title]<: [Sub-Title]> |
| This types the name of the subject, surname first, using the same Template segment described above for the Source Abbreviation, except the Transform to remove periods is omitted. | The [Sub-Title] Variable and its preceding colon are enclosed in Conditional Brackets so the colon and space will not appear in the output if there is no sub-title.
The Short Title Source Element is populated with just the [Article-Title] Variable. |
The remaining elements of both Templates are the same. The date of the newspaper and the location of the paper are output with Variables with data from the record:
[Date]I find that Newspapers.com is inconsistent about how it indexes the page number of the clipping. In some cases the page number appears by itself, and sometimes the field contains the label "Page" separated from the number with a space. The Templates deal with that by including the literal text "pg " in order to get uniform results in my preferred format, then applies a :split Transform to output only the last segment, the actual number, from the Page field:
pg [Page:split: :-1]If only the number is in that field, the "last" (only) segment is that number, and if the text "Page" is present the last segment is just the number.
Finally, I enter the name of the repository in which I found the clipping with literal text:
Image found online on Newspapers.comThe following are the complete Templates for the obituary and newspaper clipping items. They can be copied from the areas below and pasted into Text or Auto Type Templates in the OraSettings window. Changes in various elements as described above will likely be required to suit your system and methods. The separation of the coding into "paragraphs" here is used only to make the coding easier to understand. The paragraph breaks are ignored by ORA when the Template is used. I have included Comment lines, proceeded with an " # " character, to describe some of the steps.
Name (Text Template):
# Use "Clip Title" (from user-created clips) if Name is not present
<[?:Name]|[=Name:[Clip Title]]>
# Apply standard capitalization in case name is in all caps
[=Name:[Name:capitalize]]
# Remove "Obit" and any following characters
[=Name:[Name:replace: Obit.*:]]
[Name]
Filename (Text Template):
[=Name:[Name:replace:\.:]]
D:\\Genealogy\\Sources\\Newsclips\\from Newspaper.com\\[Date:date:yyyy-mm-dd] [Paper] -
<[Abbreviation text]|<[Name:nameSurname], <[name:namePrefixraw] >[Name:nameGiven]<, [Name:nameSuffixraw]> obit>>
Obituary (Auto Type Template):
{F4}{SHIFT+TAB} {300}{fast}news{800}news{800}news{tab*3}
obit- [Name:nameSurname], <[name:namePrefix:replace:\.:] >[Name:nameGiven:replace:\.:]<, [Name:nameSuffix:replace:\.:]>{tab}
obit- [Name:nameSurname], <[name:namePrefix:replace:\.:] >[Name:nameGiven:replace:\.:]<, [Name:nameSuffix:replace:\.:]>{tab}
[Paper]{tab}{tab}{tab}
[Name:nameSurname], <[name:namePrefix] >[Name:nameGiven:replace\b([a-z]) [ ]:$1.]<, [Name:nameSuffix]>{tab}
[Date]{tab}
[Location]{tab}
pg [Page:split: :-1]{tab}
<[name:namePrefix] >[Name:nameGiven:replace\b([a-z]) [ ]:$1.]<, [Name:nameSuffix]>{tab}
Image found online on Newspapers.com
Clipping (Auto Type Template):
[==:Abbreviation text]
[=:Article-Title]
[=:Sub-Title]
{F4}{SHIFT+TAB} {300}news{fast}{tab*3}
newsclip- [Abbreviation text]{tab}
newsclip- [Abbreviation text]{tab}
[Paper]{tab}
[Article-Title]<: [Sub-Title]>{tab}
[Article-Title]{tab}{tab}
[Date]{tab}[Location]{tab}
pg [Page:split: :-1]{tab*2}
Image found online on Newspapers.com{tab}
| ReigelRidge Home | Terry's Tips Home | Contact Terry |
Copyright 2000- by Terry Reigel