Terry's ORA Tips
Getting Started with Online Repository Assistant
This page created 29 May 2020
This article provides an overview of what Online Repository Assistant (ORA) is, how to install it, and the basics of using it. Other articles in my ORA Section cover more specific topics about using the software.
|
Topics Included in this Article |
|
|
Installing the ORA software |
|
|
The basics of using the OraPanel |
|
Keeping track of records you have previously examined. |
|
The gateway to more ORA features |
|
Additional comments and links on Templates |
What is ORA? Technically, it's a browser extension. Extensions are software products that work with your browser to "extend" it by providing features not built in to the browser, such as changing the appearance of a page being viewed, or providing capabilities not offered by the page. That's exactly what ORA does. It collects data from within the page of a supported genealogy service web page and presents it in a neat little "OraPanel" in a corner of the page. It then offers various ways to copy or export that data to your preferred genealogy program, or to other programs. In addition ORA offers a way to annotate the search results provided by the genealogy service so you can keep track of which of them you have reviewed and what you decided about each result.
ORA works with the most popular genealogy service providers, including these at the time of this writing:
| Ancestry.com |
FamilySearch.org |
| FindAGrave.com |
Newspapers.com |
| NovaScotiaGenealogy.com |
|
For supported services, the OraPanel appears on the pages where information for a specific record is summarized. That is typically not the page where a list of search results appears, but on the page that opens when you click on one of those results. On FindAGrave.com, for example, that is the individual memorial page, where details about a specific person are shown.
There is also a "Generic Service" option that works with any web page, but the amount of data collected from these pages is generally much less than from supported services. Still, if you use a service not currently supported it may be worth a try. You have to "enable" the Generic Service option on the ORA Setting page to do so.
ORA works in the current version of four major browsers: Chrome, Edge, Firefox, and Opera.
Installing ORA
ORA actually consists of two parts, the browser extension, as described above, and the OraHost, which is a program you install on your computer to handle all the necessary "behind the scenes" work. It automatically starts when you open a browser window that uses the ORA extension, but you seldom see the Host program itself. The OraHost program is officially tested and supported to run on Windows 10, though some users have reported success with earlier versions of Windows.
To install ORA you first purchase a license from the Family History Hosting webstore. Once you receive your license information, follow the instructions in the Installation Help page, which involves these steps:
- OraHost requires an optional Windows component called Microsoft .NET Core 3.1. If that has not already been installed on your system, follow the link in the Help page to download and install it. If you do not, the OraHost installer will remind you.
- Then use the link provided in the email with your registration information to download the OraHost program. Install it, and enter your registration information when the Registration screen opens.
To more easily copy the registration details into the Registration screen, copy all the lines in the email from "First Name" to "Valid Through." Then, in the lower right corner of the ORA Registration screen click the Paste All button to paste the information with a single click.
- After OraHost is installed, open your browser and install the ORA extension from the browser's extension store. Details for each supported browser are in the Installation Help page.
You are now ready to use ORA. Open your favorite genealogy service website, search for any data record, and open any record that appears in the search results.
In FamilySearch.org, you must open the actual record details page, not the pop-up that appears when you click on one of the listed search results. To do that click on the button that looks like a small page –  – in the right column of the result you want to view
Using the OraPanel
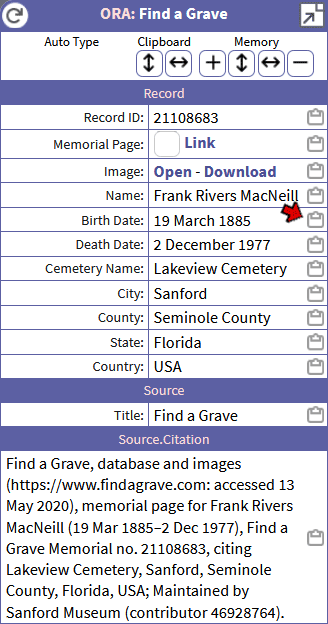 When you navigate to a record details page on a supported genealogy service, the OraPanel, as shown in the illustration on the right, will appear. This is the default OraPanel, as it appears on a memorial page on FindAGrave.com.
The key information from the page is collected and listed with labels derived from the page. The information listed will depend on the service being used and on the data collection within that service. For FindAGrave there is only one collection, but others have hundreds of collections. The available information may differ within the same collection, depending on what information has been indexed for a particular record.
From this screen you can easily copy individual items of data, by clicking the clipboard icons on the right side of each item, and paste them into your genealogy program. You can of course select data items from the body of the page and copy them. However, when I do that I find that I often accidentally include hidden HTML characters in my selection, and then the paste operation fails because my genealogy program doesn't know what to do with the hidden characters. I find that to be especially an issue when trying to copy the cemetery name on FindAGrave because that is a link to the page for the cemetery, and copying text from links is especially error prone.
In addition to copying and pasting individual data items, there are three other ways to extract the data collected there:
- You can use the buttons under the Clipboard and Memory labels at the top of the OraPanel to copy all the data items, or even items from several records, and paste them in a spreadsheet for analysis. This is described in my article on Clipboard & Memory Buttons.
- You can create simple Text Templates to format data items to your preferences, or combine several data items and other text to form a string of text to paste all together into your genealogy program. The results will appear as items to be copied at the bottom of the OraPanel. You can then copy and paste a prepared string of text, for example, into the citation details or event memo fields of your genealogy program. This is explained in my article on Template Basics.
- You can create Auto Type Templates which allow ORA to type data from one or more of the items listed in the OraPanel, together with fixed text that you specify, into your genealogy program. Auto Type can include controls like "tab" characters to place the data into different fields in your genealogy program's data input screens. How to do this is described in my article on Auto Type Templates.
For more information about how to find the OraPanel on various repository webpages, see my article on Basic Tips and Tricks.
Using the Record Status Feature
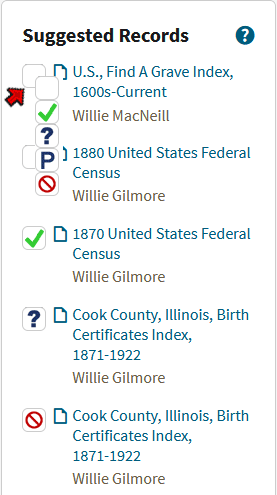 A totally separate feature of ORA is the ability to record status information about records you have previously examined. Genealogy services generally have a method for searching for records of interest, and provide a page of results listing the records found. Some also provide a list of "suggested records" based on the record currently being viewed. ORA recognizes the records on these lists and allows you to place a status icon next to each to help you keep track of your conclusions about each item you have previously examined.
The illustration on the right shows a list of suggested records from an Ancestry page for a census record. ORA has placed an empty icon next to each item listed, and several of them have been set to various values by the user.
You change the status by clicking on the icon, and the list of five icons appears as shown at the upper left of the illustration. Click on the desired icon to attach that one to the record. The suggested meaning of the icons is as shown in the list below:
 |
Not reviewed |
 |
Accepted / Entered |
 |
Questionable – Might Apply |
 |
Rejected |
 |
Pending |
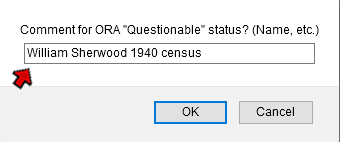 If you choose the "Questionable" or "Pending" status, a small dialog box opens in which you are encouraged to enter brief notation about that item, as illustrated on the left. It doesn't matter what you enter, but it is helpful if you enter something meaningful to you. If you don't enter something only the record identification number of the service will appear on the list of open items, which is unlikely to be helpful in recognizing a given record.
 If you want to review records that you have marked as Pending or Questionable you can open a list of them from ORA Status window in your browser. You open the OraSettings window by clicking the ORA icon –
  – in the toolbar at the top of the browser. The illustration on the right shows the top part of the Status window.
 To open the list of records marked as Pending or Questionable you click one of the buttons marked with the red arrows in the illustration above.
The screen that opens, as shown in the illustration on the left, shows a list of all of the items you have marked with that status. The text for each item is a link. Clicking a link in that list opens the associated record.
You remove a record from either list by changing the status of it to another value.
For more on locating the Status Icons in a repository page, see my Basic Tips article.
The OraSettings Window
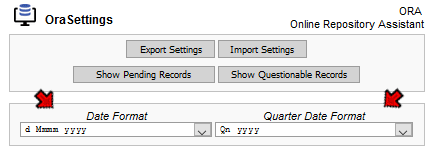 Opening the ORA Setting window, and its first function, providing access to the list of Pending and Questionable records, is described above. The use of the Export and Import Settings buttons is described in my article on Template Basics.
The controls in the second box on the OraSettings window set the format of dates when they appear in the OraPanel. This is done with the two drop-down lists, as marked with red arrows in the illustration on the right.
When ORA recognizes a date in a record, it displays it in the OraPanel in a standard format, not necessarily in the format it appears in the record. The Date Format field at the top of the OraSettings Screen controls which format is used. Several different formats are offered. To change the format being used, open the drop-down list and choose the one you prefer. The illustration below shows this list.
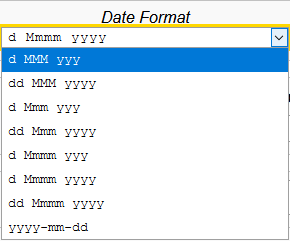 The meaning of the codes in that drop-down list is shown below:
| Code |
Output |
| d |
day, written as a one or two-digit number |
| dd |
day, written as a two-digit number, with leading zero if needed |
| Mmmm |
month, written out in mixed case, e.g. January |
| Mmm |
month, written as a three-letter abbreviation in mixed-case, e.g. Jan |
| MMM |
month, written as a three-letter abbreviation in upper-case, e.g. JAN |
| mm |
month, written as a two-digit number with leading zero if needed, e.g. 01 |
| yyy |
year, written as a three or four-digit number |
| yyyy |
year, written as a four-digit number, with leading zero for years before 1000 |
All the formats on the list separate the day, month, and year with spaces, except for the bottom one which separates them with hyphens.
Generally you would set this date to the format you will use most often, perhaps the one you want to use when pasting dates into a date field in your genealogy program. You may need dates in different formats for a specific application, say for use in a filename for saving an image file. You can do that by creating a Text Template, as described in my Template Basics article, using a date Transform, as described in my article on Transforms. You will then be able to copy and paste the date in that format when needed.
The Quarter Date Format is used for those records that are recorded in "quarter dates" rather than full dates, and works similarly.
The remainder of the OraSettings window is used to create and manage Templates, which are described in my articles on Templates, starting with the one Template Basics.
Conclusions
This article describes only basic "out-of-the-box" functions of ORA – the Record Status feature and copying individual data items from the OraPanel to paste them into your genealogy or other program. ORA can do much more to save you time and reduce typing errors in recording data from online services. To see how, please see the other articles in this Section.
In particular, I suggest you explore simple Templates, which are described in my article on Template Basics. They allow you to copy the data in a different format than the way it's recorded with a single click, and paste it into your genealogy program just the way you prefer. Perhaps you want a date in a different format; to pull city, county, and state individually out of a field that contains all of them, or the reverse; or to add bit of "standard" text you like around one or more items of data. Simple Templates you can do that and more.
In addition to my articles, the ORA help pages are a rich source of details about the available features.
Copyright 2000-
by Terry Reigel
![]() – in the right column of the result you want to view
– in the right column of the result you want to view When you navigate to a record details page on a supported genealogy service, the OraPanel, as shown in the illustration on the right, will appear. This is the default OraPanel, as it appears on a memorial page on FindAGrave.com.
 A totally separate feature of ORA is the ability to record status information about records you have previously examined. Genealogy services generally have a method for searching for records of interest, and provide a page of results listing the records found. Some also provide a list of "suggested records" based on the record currently being viewed. ORA recognizes the records on these lists and allows you to place a status icon next to each to help you keep track of your conclusions about each item you have previously examined.
  If you choose the "Questionable" or "Pending" status, a small dialog box opens in which you are encouraged to enter brief notation about that item, as illustrated on the left. It doesn't matter what you enter, but it is helpful if you enter something meaningful to you. If you don't enter something only the record identification number of the service will appear on the list of open items, which is unlikely to be helpful in recognizing a given record.
 If you want to review records that you have marked as Pending or Questionable you can open a list of them from ORA Status window in your browser. You open the OraSettings window by clicking the ORA icon –
  To open the list of records marked as Pending or Questionable you click one of the buttons marked with the red arrows in the illustration above.
  Opening the ORA Setting window, and its first function, providing access to the list of Pending and Questionable records, is described above. The use of the Export and Import Settings buttons is described in my article on
  The meaning of the codes in that drop-down list is shown below: