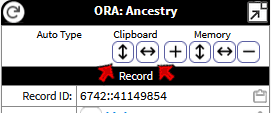
 You can copy all the data items collected by ORA for a record, in some cases including fields not displayed in the OraPanel, by clicking the Clipboard buttons at the top of the OraPanel, as shown in the illustration on the right. Click the
 This page created 29 May 2020
This article describes the features of Online Repository Assistant (ORA) that copy all the available data from a record, or from several records, and paste it into a program such as a spreadsheet. Other articles in my ORA Section cover other topics about using the software.
|
Topics Included in this Article |
|
| Copying all the data from a record and pasting it in a table | |
| Copying data from several records for comparison and analysis | |
| Additional comments and links on Templates | |
ORA collects data from within the page of a supported genealogy service webpage and presents it in a neat little "OraPanel' in a corner of the page. That data can be copied one item at a time and pasted into a genealogy or other program, as described in my article on ORA Basics. One or more data items can be re-formatted and combined with literal text for pasting into your program with Text Templates as described in my article on Template Basics, or typed directly into your program as described in my article on Auto Type Templates.
But there is another method to make use of the collected data elements, which is described in this article. You can copy all of the data elements with their labels and paste all that into a program such as a spreadsheet. You can even copy that data for several different people you want to compare, or from several different collections, such as different census years, to compare those data.
You can copy all the data items collected by ORA for a record, in some cases including fields not displayed in the OraPanel, by clicking the Clipboard buttons at the top of the OraPanel, as shown in the illustration on the right. Click the ![]() button to copy them into a two-column vertical arrangement, with the field labels in one column and the field values in the second. Click the
button to copy them into a two-column vertical arrangement, with the field labels in one column and the field values in the second. Click the ![]() button to copy them into a two-row horizontal arrangement, with the field labels in the top row and the field values in the row below.
button to copy them into a two-row horizontal arrangement, with the field labels in the top row and the field values in the row below.
The data is copied to the clipboard where it can be pasted into any application capable of accepting multiple rows and columns of data. Typically that would not be your genealogy program but a spreadsheet works well.
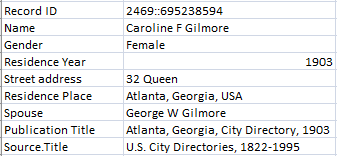 The result of copying the data from a city directory record on Ancestry.com and pasting it into an Excel spreadsheet is shown in the illustration on the right.
This feature lets you see in one place all the data from a single record. The feature described in the next section is similar but lets you create a listing of data from several different records for comparison.
The feature described above allows you to copy all the data from a single record to a spreadsheet or other program. The Memory feature allows you to copy the data from several records, for the same person or different people, and paste it into a spreadsheet for comparison.
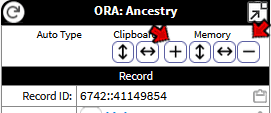 To use this feature you use the four buttons at the top of the OraPanel under the Memory label, as shown in the illustration on the right. Open each record you want to compare in turn, in the order in which you want the data to appear when pasted. For each record, click the
 ![]() button to save the fields for that record in memory. To clear memory of all saved records, click the
button to save the fields for that record in memory. To clear memory of all saved records, click the ![]() button.
button.
When you have saved all the records you want to compare, copy them to the clipboard using one of the other two buttons in the Memory section. Click the ![]() button to copy them into a multi-column vertical arrangement with the field labels in the first column and the field values in the others. Click the
button to copy them into a multi-column vertical arrangement with the field labels in the first column and the field values in the others. Click the ![]() button to copy them into a horizontal arrangement with the field labels in the top row and the field values in the rows below.
button to copy them into a horizontal arrangement with the field labels in the top row and the field values in the rows below.
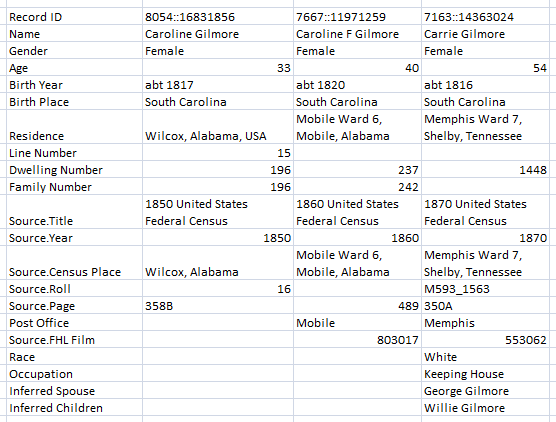 The data can now be pasted into any application capable of accepting multiple rows and columns of data. Typically a spreadsheet works well. The illustration at the right shows data from the three different census years from Ancestry.com pasted into an Excel spreadsheet.
Note that different collections have some different fields, which is accommodated by leaving a cell empty when there is no data for that field in a given record.
In this case records were assumed to be for the same person at different points in time. The table may be useful to review the data to be sure each is actually for our target person.
In another application, we might collect several records from the same Collection, say a single census year, for people who appear to be candidates for a person whose records we are seeking. By examining a similar table we may see clues that help us decide which of them is our target person.
You can of course examine several records one at a time and try to compare them that way. The methods described above provide an easy way to collect data from these records and list it in a format that makes it is easier to compare them.
| ReigelRidge Home | Terry's Tips Home | Contact Terry |
Copyright 2000- by Terry Reigel