This page updated 28 Feb 2014
Applies to Versions 8 & 9
TMG has a very comprehensive set of capabilities for recording source information, including these features:
But sometimes this very "comprehensiveness" makes using the system seem daunting. This article is intended to help a user better understand TMG's capabilities for managing sources, and offer some guidance for getting started in using the system.
Topics Included in this Article |
|
| Understanding the terms used | |
| Defining a Source by the "short-cut" method and "full featured" method | |
| Defining a new Source – the short-cut method | |
| Citing our new Source | |
| Examples using other types of sources | |
Some readers may find the article on sources in my TMG
basics series helpful. That series is conceptual, rather than practical.
Some readers like it; others don't. ![]()
Before we begin, it's helpful to have an understanding of the basic parts of the system.
A Source is something from which we have obtained information.
A Citation links a Source we have defined to the information we recorded based on that source.
A Repository is a place where a source can be found.
With these ideas now defined, how do we actually go about creating a Source Definition? There are two methods for defining a Source in TMG. One I call the "short-cut" method, in which the Source is defined right in the Citation screen the first time it is cited (in TMG 9 and later). This method is simpler, because fewer screens are navigated, and the work flow seems more natural to some. For that reason this method is illustrated in the remainder of this tutorial. But some features are only available using the "full-featured" method, so we will mention them before proceeding.
The full-featured method uses a separate Source Types screen and Source Definition screen. This method will be useful if you want to do any of the following:
The full-featured method is described in my Source Tutorial – Full Method article.
What follows is a step-by-step description of defining a new Source and citing it using the short-cut method (this method not available in TMG 8 - see the Full Method article instead). The first step is the actual definition of the Source. We are going to use a very common source as an example: an e-mail message from a relative.
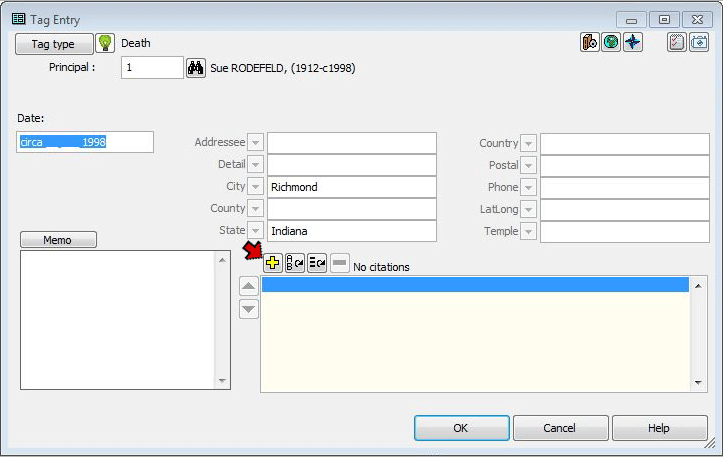
The short-cut method begins from the Citation screen. If you are entering a Citation from a Tag the Citation screen is opened by clicking the "Plus" button above the "Citations" block of the Tag Entry screen, as shown by the arrow below:
If you are entering a new person the Citation screen is opened by clicking the similar button at the bottom of the Add Person screen. In either case, the Citation screen then opens:
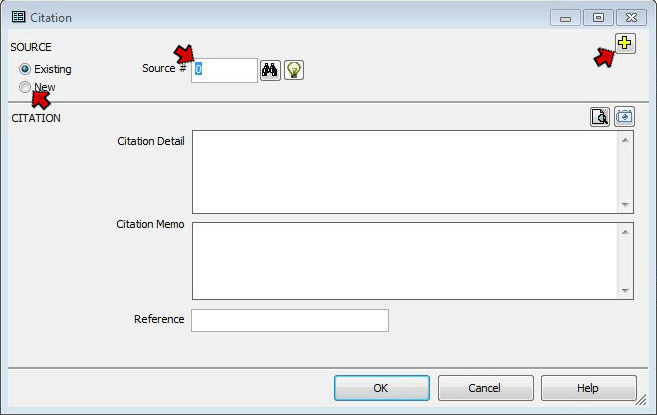
From the Citation screen we have several choices. If we wanted to cite a previously defined Source we would enter its number in the "Source #" field, click the binoculars ![]() (Search) button to select it from the Master Source List, or press the F3 key to recall a recently used Source. If we wanted to use the full-featured source definition method we would click the
(Search) button to select it from the Master Source List, or press the F3 key to recall a recently used Source. If we wanted to use the full-featured source definition method we would click the ![]() (New Source) button at the upper right corner of the screen, or click the search button to define a new Source from the Master Source List.
(New Source) button at the upper right corner of the screen, or click the search button to define a new Source from the Master Source List.
However, in this example we are using the short-cut method, so we select the "New" option on the upper left corner to open the expanded Citation screen. When we do that, the Citation screen expands to display the fields used to define the new Source:
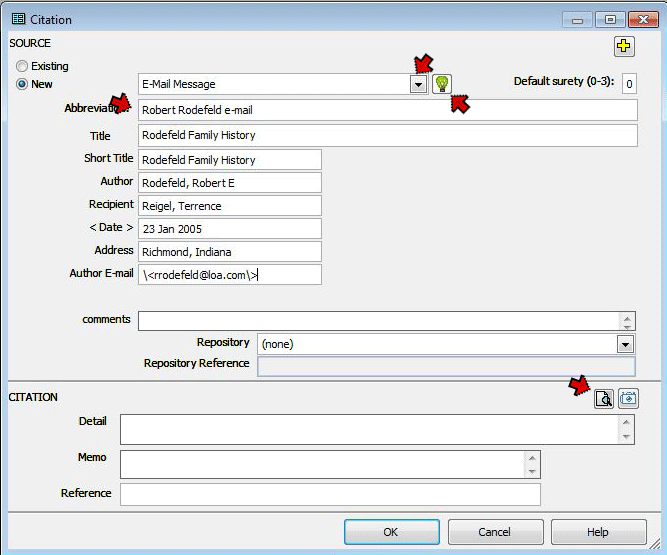
The first step is to select an appropriate Source Type from the drop-down list at the top of the screen. Different types of sources are described differently, using characteristics appropriate for each type. The definition for a book, for example, might include title, author, and publisher, while a tombstone might include the name of the person, and the name and address of the cemetery. Further, when TMG produces footnotes or bibliography entries in reports, the items entered in the description appear in an order appropriate for the type of source, using Italics, quotation marks, and other punctuation.
When a Source Type is selected, TMG provides fields to enter the information appropriate for that type of source, and later formats the footnotes and bibliography entries accordingly. The default source types in the standard edition are based on Wholly Genes' interpretation of Elizabeth Shown Mills' Evidence! (Evidence! Citation & Analysis for the Family Historian, Baltimore: Genealogical Publishing Co., Inc., 1997). Those in the UK edition are based on designs by Caroline Gurney, specifically for sources commonly encountered in the United Kingdom.
Since we are defining an e-mail we have received, we have selected the E-Mail Message Source Type. We then proceed to enter information in the fields provided:
A Reminder screen opens for most Source Types to help us enter the appropriate data in each field:
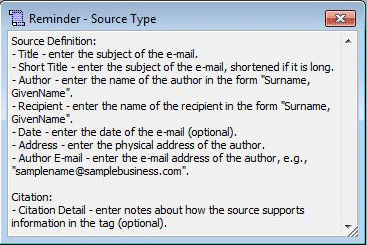
If the Reminder doesn't open automatically, you can open it manually by clicking the ![]() button at the top of the Citation Screen. For more on Reminders, see my article on Using Reminders.
button at the top of the Citation Screen. For more on Reminders, see my article on Using Reminders.
If we want to check our work before proceeding we can click the ![]() button at the lower right of the Citation Screen and see a preview of how the full footnote will appear in reports:
button at the lower right of the Citation Screen and see a preview of how the full footnote will appear in reports:
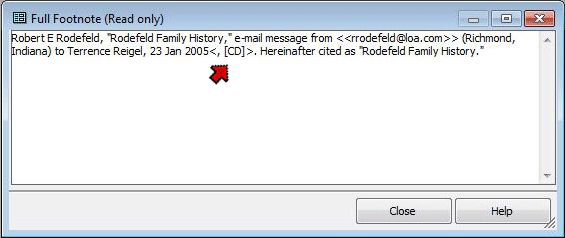
Since we have entered nothing in the Citation Detail field yet – we will discuss that next – the place where any text we enter there will appear is indicated by the code "<, [CD]>" telling us that it will appear separated by a comma from the preceding text.
That completes the definition of our new Source. Next we will complete the citation of that Source, thus recording how it applies to the Tag we have created.
Now that our new Source is defined, we can complete the Citation of it for this Tag. We could simply click the OK button if we have no notation to make about how the Source supports this particular Tag. However we may often want to enter some notes to amplify this citation. For example, if we where citing a book, we might want to record the page number on which this information is found. Or if we had not entered the date of the e-mail in the source definition because we were using this source definition for several e-mails received on different days, we might enter the date of the particular e-mail we used for this tag in the Citation Detail.
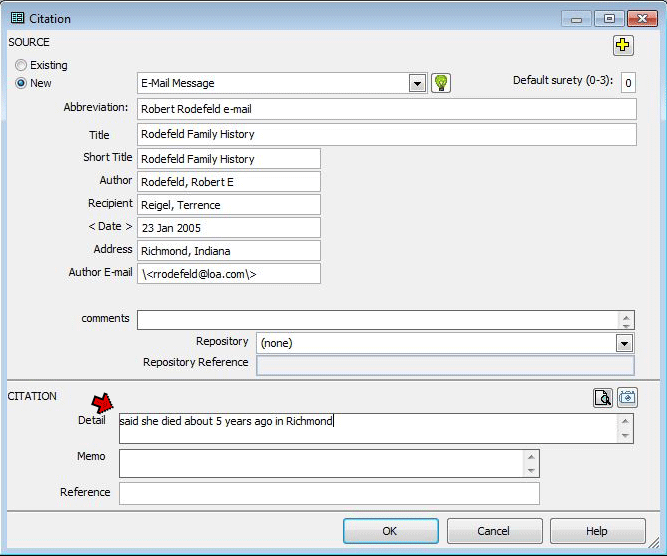
In other cases we might want to explain how the source supports what we entered. In this example we were creating a Death Tag and wanted to enter the date of death. But our source, the e-mail, didn't give a date, but said "she died about 5 years ago here in Richmond." But we entered a date – circa 1998 – in the Date field to explain that the source didn't actually give us the date, but we estimated it from the statement in the source.
In either case we would enter such notes in the Citation Detail field near the bottom of the Citation screen:
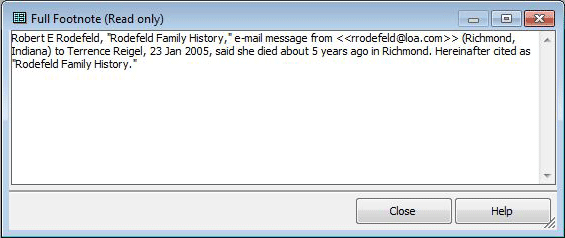
If we click the Preview button again now that we have entered text in the Citation Detail field, we find that the detail text appears as part of the preview:
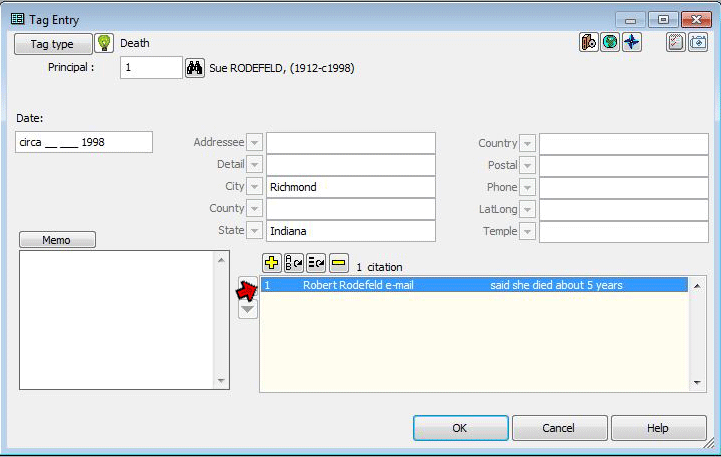
When we are done, we click the OK button to return to the Tag Entry screen. Note that the citation we just created is now listed near the bottom of the screen. The listing includes the Source Number, the source Abbreviation, and as much of the Citation Detail as will fit.
We're done! Click OK to exit the Tag Entry screen.
Now, to see the final results of our work, we can print a report for this person, using the options to print footnotes and a bibliography. Here is what we would see for this Source:
| First footnote: | Robert E Rodefeld, "Rodefeld Family History," e-mail message from <rrodefeld@loa.com> (Richmond, Indiana) to Terrence Reigel, 23 Jan 2005. Hereinafter cited as "Rodefeld Family History". |
| Subsequent footnotes: | Rodefeld, "Rodefeld Family History," e-mail to Reigel, 23 Jan 2005, said she died about 5 years ago. |
| Bibliography: | Rodefeld, Robert E "Rodefeld Family History." E-mail message from <rrodefeld@loa.com> at Richmond, Indiana. 23 Jan 2005. |
I have created three more examples of how one might use TMG's source capabilities. The examples cover three source types commonly encountered, a book, a state birth registration, and a family Bible. Each example:
In each case I tried to replicate the example in Ms. Mills' book Evidence! using TMG's default source templates. As you will see, in each case, the default template produced output similar to the example in the book, but some editing of the default template would be required to replicate it exactly, should that result be desired. My examples do not attempt to show the "best possible" method, but rather illustrate a straightforward application of the default templates. They are intended to help with gaining a basic idea of how to use the default templates, and to serve as a basis for thinking about various ways to customize the templates to achieve specific results.
The three examples are found here:
This article provides only a brief overview of TMG's source recording capabilities, using the default Source Types. Users can customize the output templates of individual sources, as I mentioned briefly above, and can modify the default Source Types, or even create their own. Some ideas for more advanced use of the source feature are found in a series of articles on Customizing Your Source Citations.
| ReigelRidge Home | Terry's Tips Home | Contact Terry |
Copyright 2000- by Terry Reigel