Terry's TMG Tips
Data Entry - a Tutorial
This page updated 12 Dec 2011
Version note: Applies to TMG 8 & 9
TMG is highly flexible, offering the user extensive control over almost every
aspect of data recording, display, and output in reports, charts, and websites.
But with that flexibility comes a variety of screens and data fields that sometimes
leaves new users a bit bewildered. This tutorial is designed to help new users
feel more comfortable with the basic tasks of entering and editing data.
For purposes of this tutorial, I assume that the reader has either imported
data from another genealogy program, or has used the new project wizard to enter
basic data about a few people, and is now ready to edit that data or add new information.
This article has three main parts, with several topics in each:
Topics Included in this Article
Part 1 – Understanding Tags |
|
A reminder that all data about a person is entered in Tags |
|
Entering Names |
|
Tags that connect parents and children |
|
Recording Births, Marriages, Deaths, and other events |
|
Allowing additional types of data to be entered |
Part 2 – Working with Tags to Edit or Add Data, or to Add People |
|
How to edit data in existing Tags |
|
How to add a new Tag to an existing Person |
|
How to add new People to your Project |
Along the way I'll offer a number of suggestions and tips that may be useful
in entering data into TMG. But before we start, we need to understand the basic
data block in TMG - a "Tag."
All Data is Entered in Tags
A very basic concept used in TMG is that virtually all information about each
person is entered in "Tags." Tags define the person's name(s), relationships
(parents and children), as well as all events, including birth, marriage, death,
and any other events or facts we choose to record. For a further discussion
of this concept, see my article on TMG Basics.
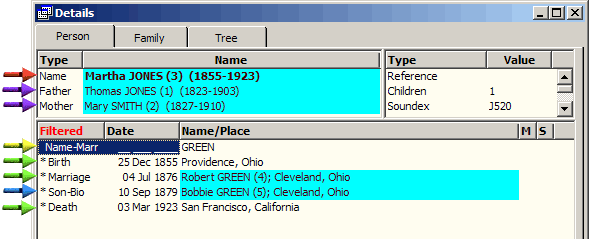
The Tags for a person are listed in the Person View of the Details screen:
Three special Tags appear in the upper section:
- Primary Name Tag – the primary Name
Tag for the person. This tag records the primary, or main, name of this
person.
- Parents – the person's mother and father. These Parent/Child Relationship Tags create the links between this person and his or her parents. (Actually, we should note that these are the Primary Parents – a child can actually have non-primary parents as well, which would appear in the main area below.)
In the "tag box," or main area, of the Details screen we see all
the other Tags recorded for this person, including:
- Alternate Names – Any other names by which the person was
known. In this case, it is a married name, but could also be a nickname
or an alternate spelling.
- Events – all manner of events can
be recorded by Event Tags. Here we have the person's birth, marriage, and
death entered. We might also have tag for occupations, anecdotes, military
service, or any other event, fact, or note about the person we might care
to enter.
- Children – all children of this person
are linked with Parent/Child Relationship Tags, just like those used to
link the person with his or her parents. The tags for the person's children
appear in the "tag box" area with event tags, displaying the primary
birth date of the child.
Now we will look at the three main types of Tags, and see how data is entered in each type.
Except where otherwise noted, all the examples here are use the "Beginner" Data Entry mode, which hides some more advanced features to make the screens simpler. That is the default mode. You can change between Beginner and Advanced mode in Preferences, under Program Options > Data Entry
Name Tags
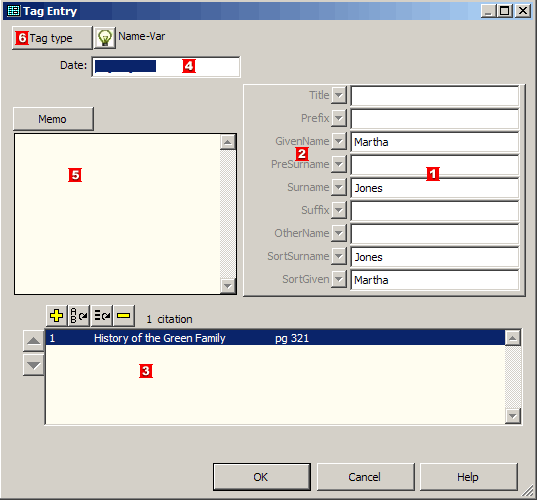
The Tag Entry screen for Name Tags contains six areas for user input:
- Name Part fields – is where the actual name is entered. Only
four of these fields are of concern to the beginning user:
- Title – used for titles, such as Dr. or Capt. (you can
abbreviate them or not as you prefer).
- GivenName – used for given names, such as John Robert
or Sue Ann.
- Surname – used for the person's surname
- Suffix – used for suffixes such as Jr., Sr., or I
All the other fields are for advanced features, such as Name Styles,
or custom sorting of the name in the Picklist and Project Explorer. Consult
Help for details on them.
Enter names in mixed case, like Jones or McClure. If you want to
see them in all upper case in screens or reports, leave the default
settings, which display in upper case, or change the settings to see
them as you enter them.
- Name Part labels – note that they are dimmed, indicating
they cannot be changed (Actually, they can be changed, by use of the
Name Style, but that's an advanced feature we will not cover here).
- Citation features – creation and citing of sources is covered
in my Source Tutorial.
- Date field – the date field has no meaning for primary names,
and is generally not used for any names. But it may be used when a name
was adopted at a specific date, for example with a legal change of name.
- Memo field – is generally not used in primary Name Tags,
but may be used for name changes, nicknames, etc. to record details about
that name.
- Tag Type button – allows you to change to another tag type in the Name Tag Group; for example, a nick name or married name tag.
Parent/Child Relationship Tags
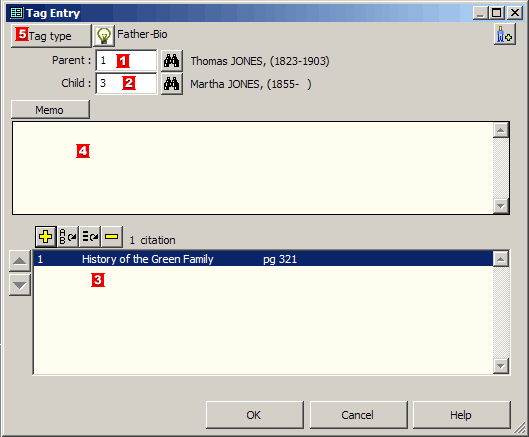
The Tag Entry screen for Parent/Child Relationship Tags contains five primary
areas for user input:
- Parent ID# field – the ID number of the parent in this relationship.
To link this child to a different parent, enter the new parent's ID#, or
click the
 button to search for the parent.
- Child ID# Field – the ID number of the child in this relationship.
To link this parent to a different child, enter the new child's ID#, or
click the
 button to search for the child.
- Citation features – creation and citing of sources is covered
in my Source Tutorial.
- Memo field – is generally not used in Relationship Tags.
- Tag Type button – allows you to change to another tag type in the Relationship Tag Group; for example an adopted Relationship
tag.
Event Tags
Event Tags include many different types of tags, including Birth, Marriage,
Death, and "Other Events" which include types like Occupation, Census,
Note, Will and many more. This example is a Marriage Tag. The Tag Entry screen
for Event Tags contains seven primary areas for user input:
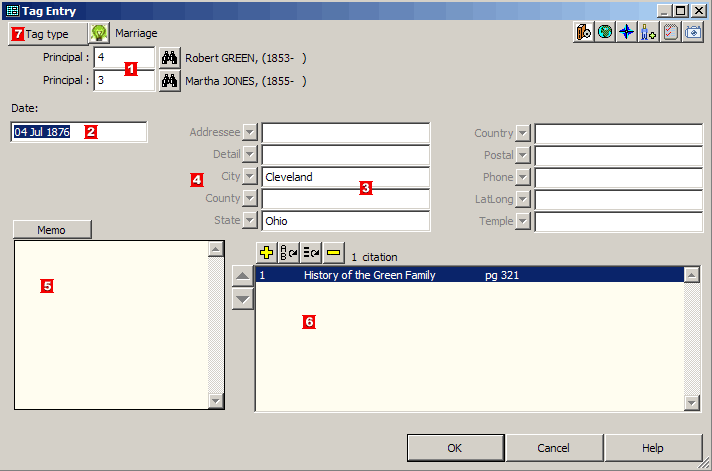
- Principal ID# fields – most event tags allow for two Principals,
that is people who participated in the event. Birth and Death Tags allow
only one. (Additional participants can be added as "Witnesses"
but only in Advanced Data Entry mode, see "Tip" below.)
- Date field – the date of the event.
- Place Part fields – the place where the event occurred. Only
five of these fields are of concern to the beginning user:
- Detail – used for street address, name of church or cemetery,
or similar details.
- City – used for the town or city.
- County – used for name of the county.
- State – used for the name of the state.
- Country – used for the name of the country.
Any of these fields can be omitted if not known, or if the user prefers
they not be used. The other fields are for advanced features, such as
Place Styles, or for special applications such as Address Tags and Repository
place entries. Consult Help for details.
- Place Part labels – note that they are dimmed, indicating
they cannot be changed (Actually, they can be changed, by use of
the Place Style, but that's an advanced feature we will not cover here).
- Memo field – is used differently for various event tags.
In some cases, such as Birth or Marriage tags, it may be used to record
additional details about the event. In other cases it is used for essential
information. For example, in a Note tag it contains the text of the note,
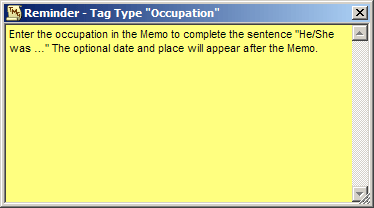
and in an Occupation Tag it would contain the occupation, such as "a
bricklayer."
- Citation features – creation and citing of sources is covered
in my Source Tutorial.
- Tag Type button – allows you to change to another tag type in the same Tag Group. The event groups are Birth, Marriage, Divorce,
Death, Burial, and Other Events.
A Reminder screen opens for Tags using commonly used Tag Types
to help us enter the appropriate data in each field. For example, here is the
one for the Occupation Tag Type:
For more on Reminders, see my article on Using Reminders.
This concludes the review of the three main types of tags. We've
left out some more obscure types, such as History tags, which are not generally
used by beginners.
 Entering Repeated Place or Other Data
We often find that we need to enter the same information that
we have previously entered elsewhere, most obviously for place and citation
information. TMG offers two tools to make this easier, and help avoid spelling
errors and inconsistencies. The functions work in almost every data entry field
in TMG - try them and I think you will find them most helpful. To use them,
place the cursor in the desired field and press the indicated key:
F3 – Repeat Function – recalls the most recently used value
in that field. Press again for the next prior value, up to 15 prior values.
Or, press Ctrl-F3, and a list of up to 15 prior values will appear and you
can select the desired value.
Special rule for citations: The Source # and Citation Detail fields are
recalled together. Using F3 in either recalls the values for both.
F2 – Search Function – searches for all values previously
used in that field. Once the list appears, type a few letters of the desired
value, and the list will scroll; select the desired value when it come into
view.
Special rule for places: Place the cursor in the lowest level you want
to recall before you press F2. Then, when you select your desired value,
all higher ranking places with be filled in as well.
 Consider Switching to Advanced Data Entry
Mode
Several time above I referred to the Advanced Data Entry Mode. The default
Beginner mode simplifies the data screens by hiding some fields that would appear
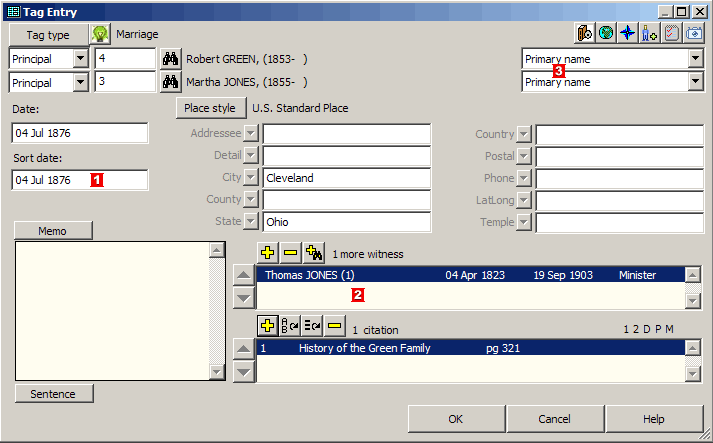
on them in Advanced Mode. Here is a Tag Entry screen for Event Tag in Advanced
mode:
Perhaps the most useful features available only in Advanced mode are:
- Sort Dates – control the sorting of tags in the Details screen
and in reports. TMG automatically sorts dated tags in chronological order,
but undated tags are sorted to the top or bottom of list. Sort Dates, which
never appear in any output, allow you to place undated tags in their approximate
chronological order, or to place tags in any desired order regardless of
the actual date entered.
- Witnesses – allow you to enter participants in events beyond
the two Principals. Witnesses are useful when you want to record in a single
tag members of a family moving together, members of a household enumerated
in a census, various participants in a wedding, and many other examples.
Use of Witnesses can quickly get quite complex, so a beginner might want
to get comfortable with TMG before using this technique.
- Name Variations – when you have entered married names, nicknames,
etc., you can choose which name will be used in reports for this event.
See my article on Name Variations for
details.
For a complete list of features enabled in Advanced mode search Help for "Advanced."
To switch between Beginner and Advanced modes, go to Preferences > Program Options > Data Entry.
Now that we have explored the various types of Tags, we will look at how to edit or add new Tags, then how to add new people to your Project.
Editing Existing Tags
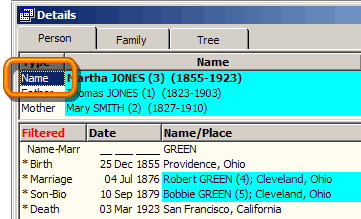
To edit any existing tag, we open it's "Tag Entry Screen." We do
that by...
- Double-clicking on the Tag Label - the word "Name" in this example,
or
- Select the Tag by clicking on it, or by using the up or down arrow keys, then either:
- Press the Enter key or the F5 (Edit) key on the keyboard, or
- Click the Edit button in the Details window (the Add, Edit, Delete, and Primary buttons visible by default, but may be turned off in Preferences > Program Options > Data Entry).
Once the Tag Entry screen is open, you can edit any of the fields, as depicted above for each of the three major types of Tags.
Adding New Tags to an Existing Person
Now let's look at how to add a new Tag for a person. First, navigate
to the desired person. Then either...
- Press the F4 (Add) key, or
- Choose Add > Add Tag from
the menu, or
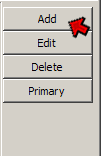
- Click the Add button on the Details screen as shown at the right (these buttons are visible by default, but can be turned off in Preferences > Program Options > Data Entry), or.
- Click the "Add Tag" button on the Tag Box toolbar, as shown below (this toolbar not displayed by default, but be turned on with the View > Toolbars menu).

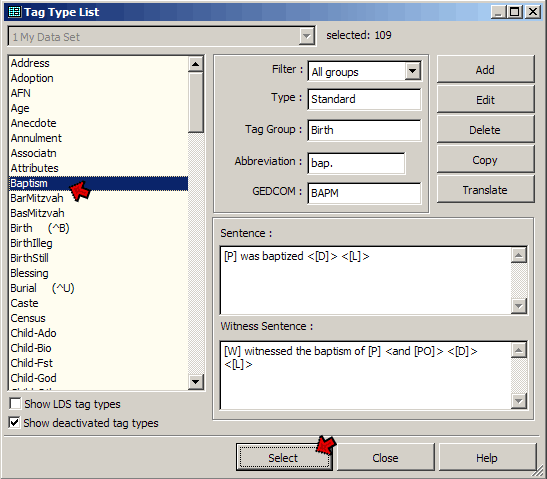
Any of these actions will bring up the Tag Type List:
Chose a Tag Type that is appropriate for the data to be entered and click the
Select button, or just double-click the desired Tag Type. This will bring up
a Tag Entry screen, as shown in the preceding sections, where you can enter
the desired data.
For certain commonly used Tag Types, such a Birth, Marriage, Death, and
Burial, you can open the Tag Entry screen directly from the Add menu or
with a keystroke. For example Ctrl-B opens the Birth Tag Entry screen. The
keystrokes appear in the bottom section of the Add menu. They also appear on the list of Tag Types, as shown above, where "(^B)" indicates that Ctrl‑B opens the Birth Tag.
Adding New People
So far we have discussed editing existing Tags, and adding new Tags to people
already entered in your Data Set. Now we will cover adding new people to the
Data Set.
If the new person is related to someone already in our Data Set, we navigate
to that person first. Then click the Add Person button:
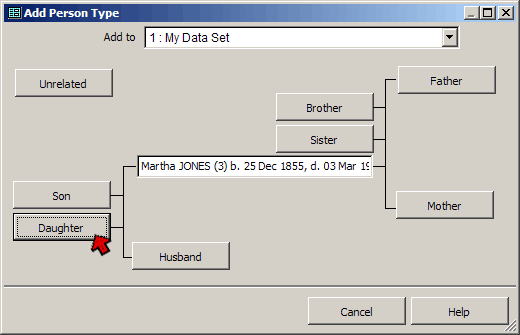
This brings up the Add Person Type screen, in which we specify how the new person
is related to the person currently in view on our screen:
In this case we are going to add a daughter of Martha Jones, so
we click the Daughter button.
You can also select how the new person is related directly, by selecting
the relationship from the Add menu.
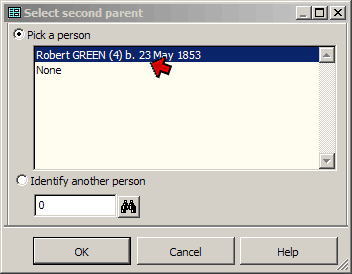
If the new person is a child of an existing person, as in this
case, we are asked to specify who the other parent is on the Select Second Parent
screen:
This screen lists the spouse(s) of the current person, and generally
we just select the correct spouse. We might also select "None" if
we don't know who the parent is or we don't have that parent entered in our
Data Set. Or, if the other parent is entered but not shown as married to the
current person, we can select them by entering their ID# in the field below
"Identify another person," or select them with the  button.
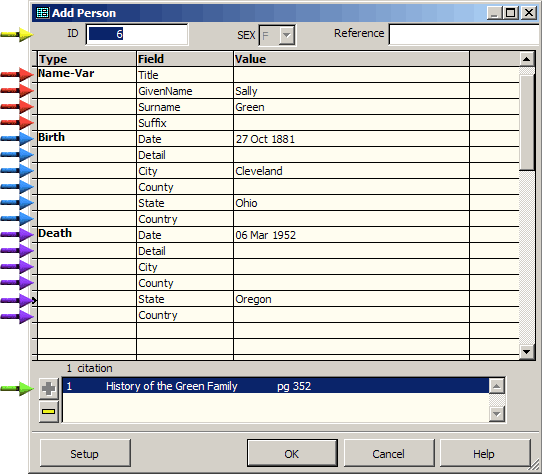
We now see the Add Person screen. The Add Person screen is a sort
of short-cut screen that allows us to do a number of things from a single screen,
including:
- Have the program assign an ID# to the new person.
- Create a primary Name Tag for the new person
- If the new person was identified as a parent or child of the current person,
create Parent/Child Relationship Tag(s) to link the new person to the parent
or child.
- If the new person was identified as a spouse of the current person, create
a Marriage Tag for them.
- Optionally, create Birth and Death Tags for the new person.
We can look at the screenshot below to see how this works:
When we click the OK button we will enter the following data into our Data
Set:
- ID# – TMG automatically assigns an
ID number for the new person.
- Name Tag – a Name Tag will be created
for the new person.
- Birth Tag – because we entered a
birth date and place, a Birth Tag will be created. Had we not entered anything
on these lines no Birth Tag would be created.
- Death Tag – because we entered a
death date and place, a Death Tag will be created. Had we not entered anything
on these lines no Death Tag would be created.
- Marriage Tag – had we said the new
person was a spouse of the current person, a Marriage Tag would have been
created, regardless of whether or not we entered any date or place information.
Because in this example we said the new person was a daughter, the Marriage
Tag lines do not appear. Caution: depending on the size of your Add Person
screen, you may have to scroll down to see the Marriage Tag lines.
- Source Citation – will be added to
each tag created. Only a single source may be cited in the Add Person screen,
and that source will be cited in every tag created.
The new person will become the focus person when the Add Person screen is closed.
You can then add other tags if you like, or edit any that were added by the
Add Person screen.
By default, the Add Person screen creates only the tags listed above. However,
by clicking the Setup button in the lower left corner of that screen, you can
customize the items displayed to fit your needs. You can make the following
changes to the default settings:
- Add additional tags so you can create them as the new person is added.
- Change which fields appear for each Tag. For example, you might remove Country
fields if you seldom enter that value in tags.
- Include Flags, so they can be set for the new person as the person is added.
For details, see my article on Customizing Your Workspace.
Related Articles
This concludes the tutorial on basic data entry. Other articles on related
topics that may be of interest:
TMG Basic Concepts – creating a "mental
model" of how TMG records your data.
Tutorial on Sources – how to create
and cite sources.
Projects and Data Sets – important
to understand if you import data from more than one file.
Working with Layouts – setting up your workspace
to suit your needs.
Susan Johnston's article The
Bubba Browne Data Set is a well-done outline of basic data entry tasks,
with a humorous twist. It was originally written for an earlier version of TMG,
and she has updated it, leaving the changes apparent so newer features are noted.
Copyright 2000-
by Terry Reigel





![]() button.
button.