This page updated 28 Feb 2014
Applies to Versions 8 & 9
This article is a continuation of my Source Tutorial article. TMG has two methods of defining Sources, which I call the "short-cut" method and the "full-featured method." My Source Tutorial article provides background information about using Sources in TMG, and described in detail the "short-cut" method. This article describes the "full-featured method."
Topics Included in this Article |
|
| Defining a new Source – the full-featured method | |
| Citing our new Source | |
| Controlling the way output is written | |
The full-featured method described in this article uses the separate Source Types screen and Source Definition screen, while the short-cut method defines the Source entirely in the Citation screen. The full method will be useful if you want to do any of the following:
What follows is a step-by-step description of entering a new Source and citing it using the full-featured method. We are going to use a very common source as an example: an e-mail message from a relative.
The full-featured method begins from the Master Source List. If you are creating the Source in anticipation of citing it in a Tag or the Add Person screen, open the Master Source List from the Tools menu.
If you have opened a Tag or the Add Person screen and are about to cite a new Source, open the Master Source list by clicking the ![]() (Search) button next to the Source # field in the Citation screen. Alternately, you can click the
(Search) button next to the Source # field in the Citation screen. Alternately, you can click the ![]() (New Source) button at the upper right corner of the Citation screen (TMG 9 and later) and go directly to the next step, the Source Types screen.
(New Source) button at the upper right corner of the Citation screen (TMG 9 and later) and go directly to the next step, the Source Types screen.
From the Master Source List, click the Add button:
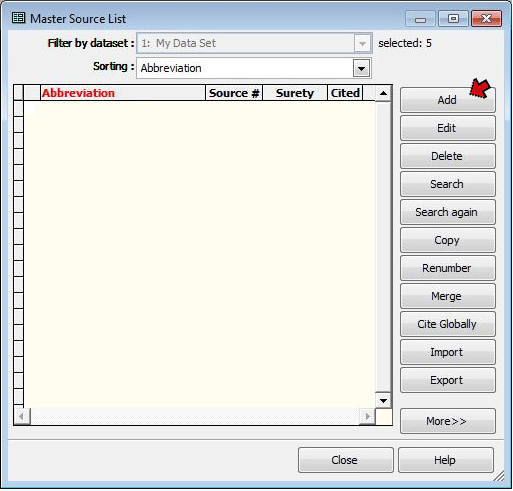
This opens the Source Types list. TMG provides an large number of predefined Source Types, to help create a source definition that is appropriate for the particular type of source you are defining. Different types of sources are described differently, using characteristics appropriate for each type. The definition for a book, for example, might include title, author, and publisher, while a tombstone might include the name of the person, and the name and address of the cemetery. Further, when TMG produces footnotes or bibliography entries in reports, the items entered in the description appear in an order appropriate for the type of source, using Italics, quotation marks, and other punctuation.
When a Source Type is selected, TMG provide places to enter the information appropriate for that type of source, and later formats the footnotes and bibliography entries accordingly. The default source types in the standard edition are based on Wholly Genes' interpretation of Elizabeth Shown Mills' Evidence! (Evidence! Citation & Analysis for the Family Historian, Baltimore: Genealogical Publishing Co., Inc., 1997). Those in the UK edition are based on designs by Caroline Gurney, specifically for sources commonly encountered in the United Kingdom.
Since we are using the standard edition, we scroll down the list of Source Types searching one appropriate for our e-mail source, and find:
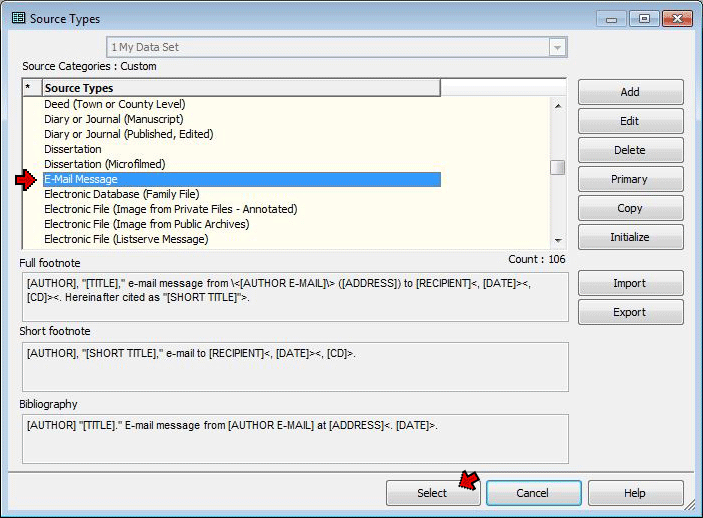
We select the E-Mail Message Source Type. Notice that the templates for the selected Source Type appear in the bottom half of the screen, which may be helpful in deciding which Source Type to select. There is more discussion about Templates below. After selecting the desired Source Type, click Select. This opens a Source Definition screen, with the E-mail Message source type selected. We then proceed to enter information in the Source Element fields:
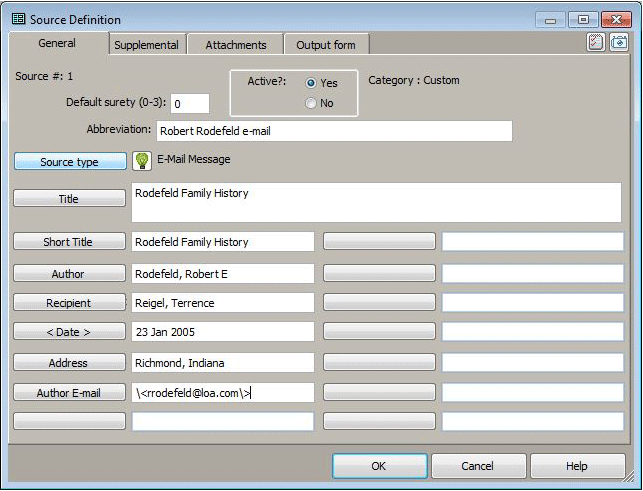
For this Source Type, we entered information into the following Source Elements:
A Reminder screen opens for most Source Types to help us enter the appropriate data in each field:
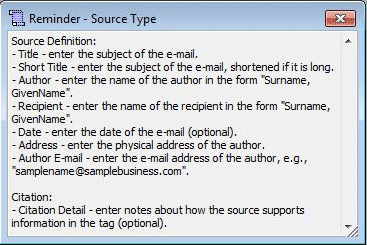
If the Reminder doesn't open automatically, you can open it manually by clicking the ![]() button at the top of the Citation Screen. For more on Reminders, see my article on Using Reminders.
button at the top of the Citation Screen. For more on Reminders, see my article on Using Reminders.
If we want to check our work we can see a preview of the footnotes and bibliography entries our Source will produce by going to the Output Forms tab of the Source Definition screen:
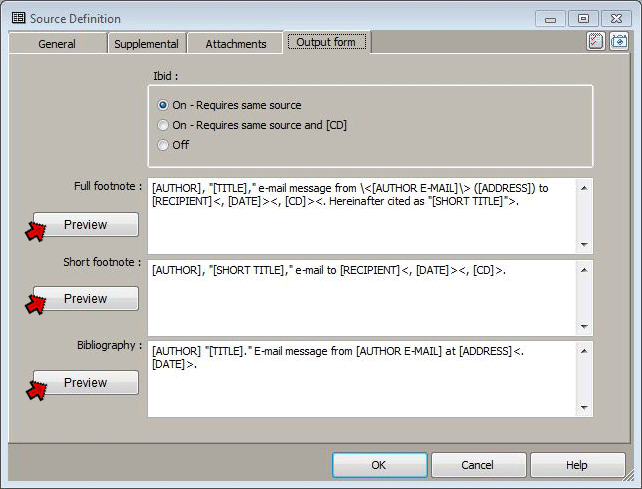
We discuss more about this tab below, but for now we will focus on the Preview function. Clicking on any of the three Preview buttons displays a preview of that item. Here we see the preview of the Full Footnote:
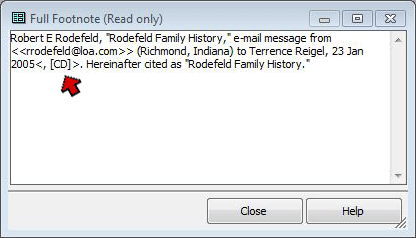
If we see that something does not appear as we expect, we can go back to the General tab and modify our entries, or to the Supplemental tab or the Repository Definition screen if those are used by the Source Type we have selected.
Note that the Citation Detail is not entered in the Source Definition, but is entered as part of each Citation when we cite this Source, as discussed next. Since each Citation might have different information entered, the preview cannot know what that might be, so it simply displays the "<, [CD]>" code to indicate where the information from the Citation Detail will appear in the actual note.
When you are satisfied with the entries, click OK to close the Source Definition screen, and we can see our newly created source listed in the Master Source List:
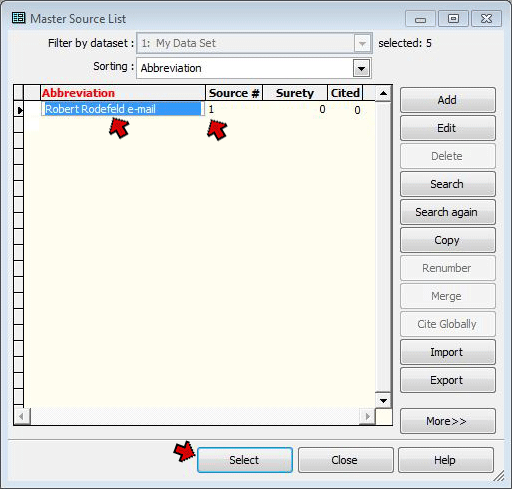
Note that the source is listed with its Abbreviation and the source number, which is 1 in this case, because it is the first source we have entered.
Be aware that the "More >>" button changes the Master Source List to a different display mode – if you see a "<< Less" button there, click it to return to this mode.
If we began this process by opening the Master Souce List from the Tools menu, click Close to complete the definition of the Source (the Select button shown above will not appear). If we began the process from a Citation screen, click the Select button to return to that Citation screen.
Now that our new Source is defined, we can cite it in a Tag, or in the Add Person screen. If we began the definition of the new Source by opening the Master Source List from the tools menu, we can now cite it in a new Tag we are adding, an existing one we want to add a Citation to, or in the Add Person screen by opening those screens. If we began the process of defining the Source from a Citation screen, we will already be back in that Citation screen, the next step.
In this example, it will be citing our new Source in a Death tag because our correspondent provided information about the death of a cousin:
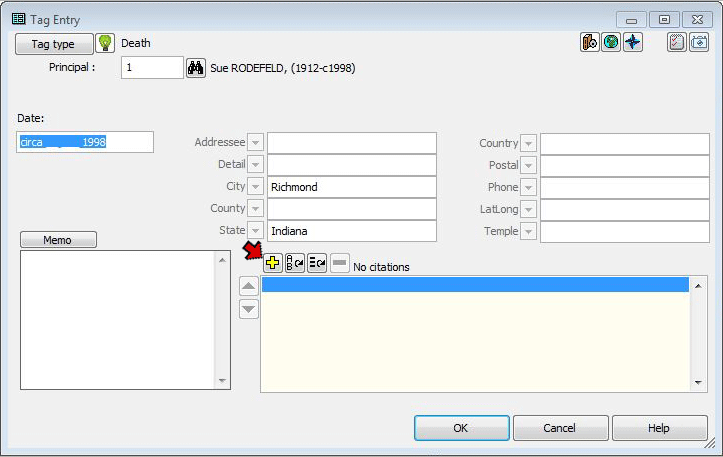
After information is entered in the various fields we click the ![]() (New Citation) button near the
bottom of the screen, above the (currently empty) list of citations to open the Citation screen:
(New Citation) button near the
bottom of the screen, above the (currently empty) list of citations to open the Citation screen:
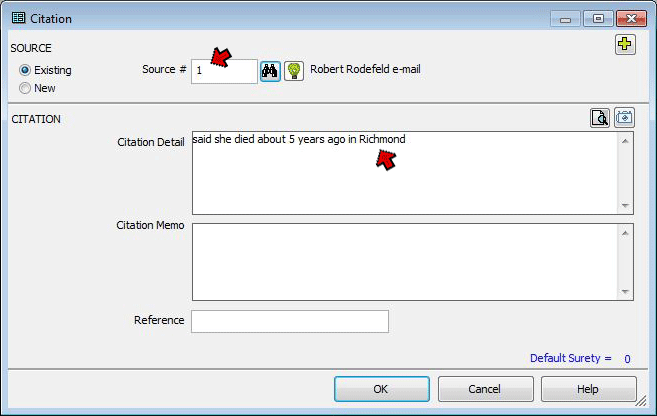
In the Citation screen, we entered:
When we are done, we click the OK button to return to the Tag Entry screen. Note that the Citation we just created is now listed near the bottom of the screen. The listing includes the source Number, the source Abbreviation, and as much of the Citation Detail as will fit.
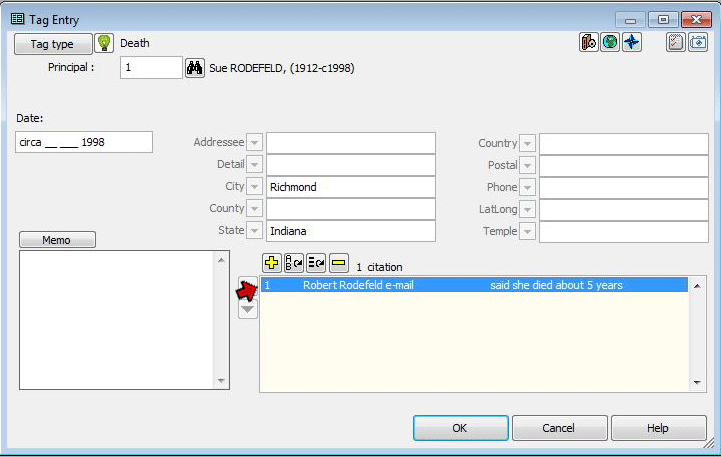
We're done! Click OK to exit the Tag Entry screen.
Now, to see the results of our work, we print a report for this person, using the options to print footnotes and a bibliography. Here is what we see for this source:
| First footnote: | Robert E Rodefeld, "Rodefeld Family History," e-mail message from <rrodefeld@loa.com> (Richmond, Indiana) to Terrence Reigel, 23 Jan 2005. Hereinafter cited as "Rodefeld Family History". |
| Subsequent footnotes: | Rodefeld, "Rodefeld Family History," e-mail to Reigel, 23 Jan 2005, said she died about 5 years ago. |
| Bibliography: | Rodefeld, Robert E "Rodefeld Family History." E-mail message from <rrodefeld@loa.com> at Richmond, Indiana. 23 Jan 2005. |
This completes the step-by-step tutorial.
There is one subject we skipped over in the tutorial that should be mentioned. Recall that we said the Source Type selected determines both which elements are included in the source definition and how they are used in creating the footnotes, endnotes, or bibliography. The Source Type accomplishes this with it's Output Template. Actually, there are three of them, one for the Full Footnote, one for the Short Footnote, and one for the Bibliography.
We can see the default Output Templates when we choose a Source Type (see above) or from the Source Definition screen, by going to the Output Forms tab:
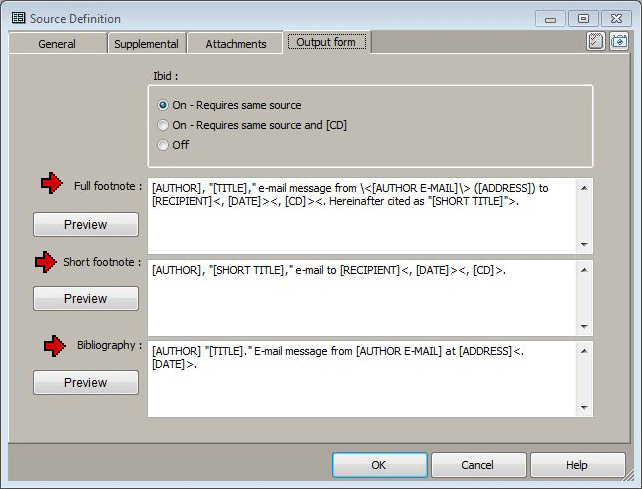
Here we can see the three Output Templates. Understanding the Output Templates helps in understanding how the Source Elements will be used. Seeing how it is used in the Templates may help if the intent of a particular source element is not clear. In this case, we look at the Full Footnote template and see that the author is printed first. Then the title, which in the case of an e-mail is the subject, is placed in quotation marks. The phrase "e-mail message from" is followed by the author's e-mail address, then his physical address, which is placed in parenthesis. The word "to" is followed by the recipient's name, and the date. The term "<, [CD]>" means that if there is a Citation Detail, it is placed next. Finally, the phrase "Hereinafter cited as" is followed by the Short Title. There are also various commas and periods appropriately placed.
Not only do the Output Templates show us how the information we enter will be used, but we can also modify any of the templates to obtain different results, if we want. Changes made to the Templates in this screen apply only to this Source, which is helpful if something about a particular Source requires a different Template than provided by the Source Type. Editing Templates is discussed in some depth my article on Working with Source Templates.
One might note that the Bibliography template does not contain a "<[CD]>" code and you might wonder why. There is only one bibliography entry for the entire report, but the Citation Detail for each Citation may be different. Since there would be no way to decide which Citation Detail to include in the Bibliography, none is permitted.
This article provides only a brief overview of TMG's source recording capabilities, using the default Source Types. Users can customize the output templates of individual sources, as I mentioned briefly above, and can modify the default Source Types, or even create their own. Some ideas for more advanced use of the source feature are found in a series of articles on Customizing Your Source Citations.
| ReigelRidge Home | Terry's Tips Home | Contact Terry |
Copyright 2000- by Terry Reigel