Terry's TMG Tips
Moving Data to New Computer or Version
This page updated 18 Jan 2020
Version note: Applies to TMG 8 & 9
This article describes how to move your data recorded in TMG 5 or later to a new computer or to a new version of TMG on the same computer. The process is essentially the same for both operations. In this article the term "new installation" refers both to a new version installed on the same computer as a prior version, or to the same or a new version installed on a different computer than previously used.
Each version of TMG since TMG 5 is a totally separate program from earlier versions. That means you can have
both the new version and older ones installed on your computer at the same time – there is no
need to uninstall the old version before installing the new one. In fact, if possible, users should not remove their prior installation until they have successfully
transferred all existing Projects and customizations to the new one.
Install the TMG Program First
The first step in installing a new version or on a new computer is to install the TMG program itself. Doing that requires that you run the TMG "installer," which is a program that copies the TMG program files to the proper locations and makes the proper entries in the Windows Registry, along with other housekeeping details. You cannot simply copy the program files from another location; you must "install" them with the proper installer.
The TMG installer has a file name like tmg9setup.exe, or tmg9uksetup.exe for the UK edition. If you do not have a copy of the current installer, my article The Future for TMG Users tells where you may find it on your computer, or where you can download a new copy. If you have not already made a copy of the current installer, do so at once while you still can, and keep a copy in a safe place.
If you obtained a copy of TMG on a CD, it is most likely useless. Unless you verify that it is the lasted edition (or if it has the serial number written on it, which you do need) you may as well throw it away. The reason is that the free updates which you should have installed if you originally had an early edition included changes in the data file formats, so your Project files will not open if you install an earlier version with the CD. You do not need to install an early version and run updates. The current installers will install a full fresh version.
By default, the program files for each version of TMG are installed in a separate location from earlier versions
if one exists on the computer. The default is C:\Program Files\The Master Genealogist
v#, or, if you have a 64-bit version of Windows, C:\Program Files (x86)\The Master Genealogist
v#, where "#" is the version number being installed. If you choose a different installation location than the default, be sure
to not use the same folder that was used to install an older version if there is one installed on your system.
Default Data File Locations
Each version of TMG by default creates new folders for Project data and for configuration files created when you make various settings within the program. Wholly Genes recommends that users storing their data in custom locations also create new folders for each version. See the Advanced Users section below if you would prefer different locations.
The easiest way to transfer existing
Projects and configuration files to a new installation is to create a backup of the project in the older installation, and then
Restore the Project in the new installation. If you have customized features such as layouts,
report definitions, toolbars, etc., they can also be transferred by
using Backup and Restore. Doing so automatically places the various files in
appropriate locations. The section below provides suggestions on how to best
do that.
The default file locations used depends on the operating system installed on
the computer. For example, all user data – Project files, backups, exhibits,
report definitions, report outputs, filters, accents, etc., are stored in the
following folder, or a sub-folder of it:
Operating
System |
Default Folder Location |
Windows 7
Windows 8
Windows 10 |
C:\Users\{user}\Documents\The Master Genealogist
v# |
Here and in the table below, "{user}" represents the user name you are using in Windows, such as "Terry," and "#" represents the version number of TMG, such as 8, or 9.
These defaults place these files in the "The Master Genealogist v#" subfolder
of the normal "Documents" or "My Documents" folders used
by most familiar applications.
For advanced users who might have reason to care about such things, certain
configuration files, such as layout and toolbar files, button images, and frames,
are stored in one of the two locations listed below for each operating system:
Operating
System |
Default Folder Locations |
Windows 7
Windows 8
Windows 10 |
C:\ProgramData\The Master Genealogist v#
C:\Users\{user}\AppData\Roaming\The Master Genealogist v#
|
What to Transfer by Backup and Restore
If you have one or more Projects created in a prior installation that you want to use
in a new installation, you will need to create a Backup of each one in the older installation,
then Restore it in the new one. Accents and Filter definitions are considered part
of Projects and can be transferred with them.
If your Project includes external Exhibits, be sure to review the External Exhibits section below about transferring them. If your exhibits are internal they are automatically transferred as part of the Project files.
If you have customized such items as Layouts, Toolbars, Report configurations,
and Backup/Restore configurations that you want to use in the new installation,
create a Backup of them in your older version, and Restore them in the new installation. Note
that you can include both a Project and the customizations in a single Backup.
If you will be transferring multiple Projects there is no need to repeat these
customized items with each Project; you only need to transfer them once.
Because of conflicts in certain information between different versions or on different computers,
the settings made in Preferences > Program Options should not be transferred
by the Backup/Restore process when upgrading to a new version. Transferring them to a new computer is not recommended because differences between the old and new systems may cause issues. The best way to transfer them is to open the new installation and your prior installation at the same time, open Preferences in each, and compare
the setting in the two, making changes in the new installation as you like.
Preparing the Backup Files
The first step is using the Backup wizard in the prior installation to a current latest
backup of your files. Open the Project you want to transfer. Then use the File
> Backup command to open the Backup Wizard:
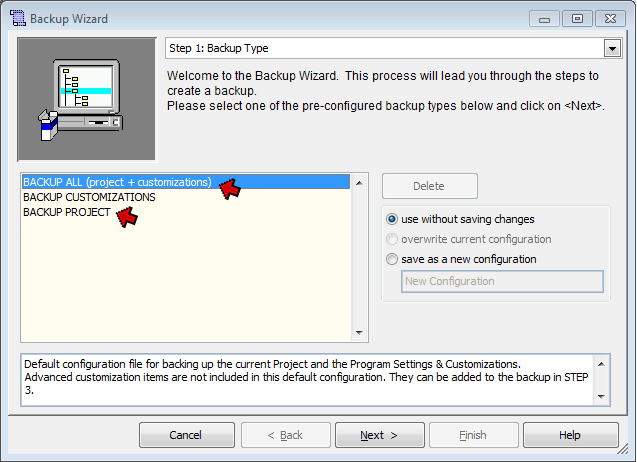
At Step 1, choose "Backup All" to transfer both a Project
and your customizations, such as Layouts, etc. Choose "Backup Project"
to transfer only a Project.
Click Next to advance to Step 2:
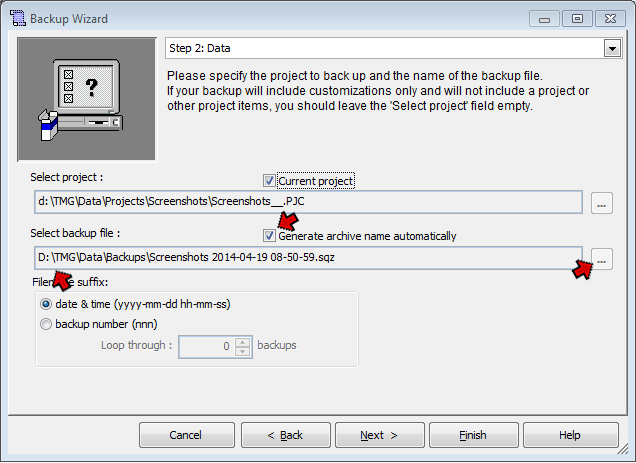
Note the location where the Backup file will be placed in the
"Select backup file" field, so you can locate it later. You will need to know that in order to Restore from the installation of on the same computer, or to copy it to the new computer if needed. If you prefer to place it in some other location, uncheck
"Generate archive name automatically" and either type in the desired
location, or click the [ ... ] button to navigate to the desired location.
Click Next to advance to Step 3:
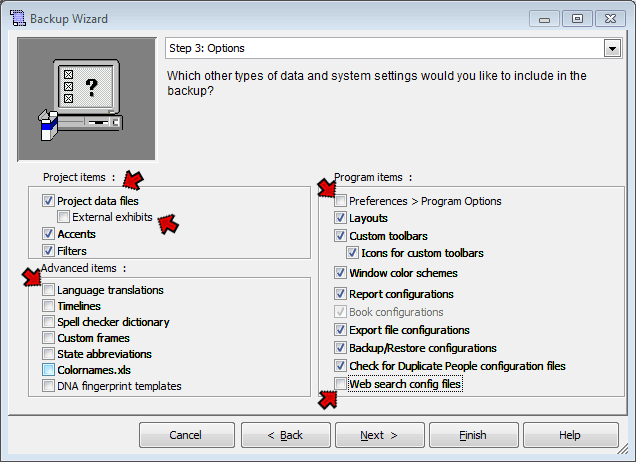
To transfer the Project, use the items in the "Project items"
box:
- Always check the "Project data files" - those are your actual
Project files.
- If your Project includes external Exhibits, read the External Exhibits section below to see whether you should check the External Exhibits box.
- Check the Accents and Filters items if you have created these items and
want to transfer them to the new installation.
To transfer configuration settings you have made in your prior version, check
the appropriate items in the "Program items" and "Advanced items"
boxes. Be sure to include all custom items you have created and want to transfer, but observe the following cautions:
- Do not check Preferences > Program Options, because
they cannot be Restored in the new installation version of TMG, and should not be Restored when transferring to a new computer, as explained above.
- It is best to leave unchecked items you have not customized to avoid unnecessary
"Overwrite this file" warnings when restoring. For example, if
you have not created any custom toolbar icon images, do not check the "Icons
for custom toolbars" item.
- If you have created a custom Language, it is probably better to use the
Export/Import feature on Languages to transfer them to the new installation, rather than
checking the "Language translations" item here. That maintains the
new translations for all the standard languages. For more on this see my article
on the Language Module.
- You transferring from a prior version to TMG 8, you should not check the "Web search config files box," since that feature was considerably revised in TMG 8.
After all the items you want to transfer are selected, continue
through the Wizard and complete the backup.
Using Restore to Complete the Transfer
Next, if your are transferring to a new computer, copy the backup to the new computer unless you can access it from the new computer over a network. Then, open the new installation and use the File > Restore command to open
the Restore Wizard, observing the following points:
- When the Select Backup screen opens, find the backup you made with your
prior version. This screen opens to the default location for backups in your new installation,
so you probably need to navigate to where the Backup was placed, either by the Backup from the prior installation, or where it was copied to.
- At Step 1, select the type of Restore that corresponds to the Backup you
made in your prior version – "Restore All" or "Restore
Project."
- At Step 2, the restored Project will be set to default location for Projects.
If you plan to have multiple Projects, you may want to add a subfolder for
each Project to that path. Simply type in the name of the folder you want
to create at the end of the text in the the "Restore project to this
folder" field, and confirm that you want the new folder created when
prompted.
If your backup includes external Exhibits, the exhibits restore path will be set
to the default exhibits folder for the new installation. See the External Exhibits section below for more on this.
- At Step 3, check the items you included at Step 3 in the Backup.
Finish the Restore, wait as TMG makes the necessary updates
to the files. Your Project is ready for use.
If your Restore included custom Layouts, they will not be available
for use until the next time you start TMG.
If you have additional Projects you want to transfer to your new installation,
repeat the Backup and Restore process for each of them, omitting the Program items after they have been moved once.
Updating Paths
TMG stores paths for various files in two separate locations, which need to be reviewed and updated if necessary:
Project File Paths – are stored as part of each Project. These paths define the default locations for Backups, configuration files, external Exhibits, Report output, and more. If the program defaults were used in the prior installation, they need to be changed to the corresponding paths for the new installation. If the new installation is on a new computer, they may need to be updated even if the previous installation was the same TMG version, since the path structures on different computers may be different for several reasons.
These paths are defined in Preferences > Current Project Options > Advanced:
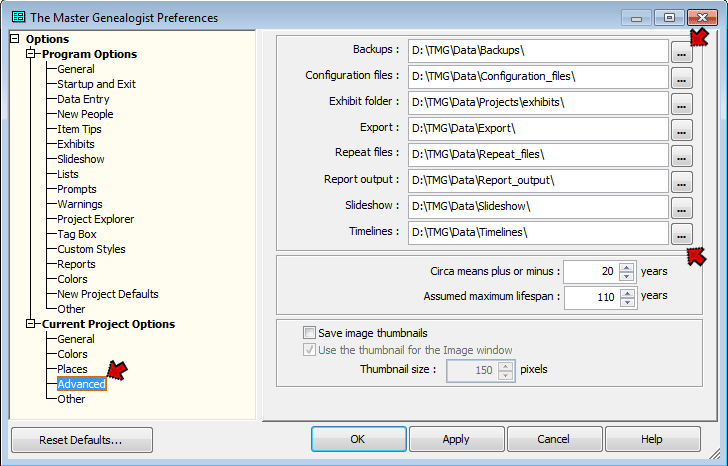
For each path in that section review and update if needed. The easiest way generally is to click the [ ... ] button to the right of each path and navigate to the new location, but you can also type in the updates. The process must be repeated for each Project if you are transferring more than one.
Report-Specific Paths – are saved as part of each report definition when a output to file is specified. By default it will be path specified as the default path, as described above. However updating the defaults does not update the paths saved in any report definitions that are transferred from a prior installation. If you have transferred report definitions and want to direct the reports to new locations you must open each report definition which has been used to send reports to file and update the path stored there:
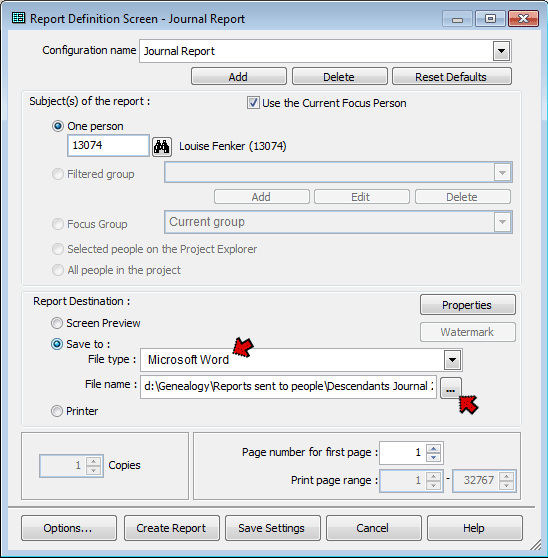
You update the path by selecting a type of File, then typing in the changes in the File Name field, or by clicking the [ ... ] button and navigating to the new location. If a given report definition has been used for several types of files, for example word processor and PDF files, each must be updated separately.
This is particularly important if you have moved to a new computer as the saved path may not be valid on the new computer.
External Exhibits
If your Project includes external Exhibits, the method of transfer depends on where the Exhibit files are stored, as follows:
Default Location – If you have external Exhibits that are located in a single folder in the default location for the prior version,
you probably want to copy them to the default location for the new installation. The easiest way to do that is probably to check
"External exhibits" at step 3 of the Backup, and include them in the Restore in the new installation.
You will then have to update the Exhibit paths as described below so they can be found in the new installation.
Another Location – If your Exhibits are located elsewhere and your new installation is on the same computer, you need do nothing. The restored Project will access them where they are. If you are transferring to a new computer, copy them separately to the desired location on the new computer, and update the Exhibit paths as described below.
Tree of Folders – If your Exhibits are located in a tree or in multiple folders do not include them in a Backup. The Restore process would place them all in a single folder, in the process overwriting any files with duplicate names. If the folder tree is under the default location, or if you are transferring to a new computer, copy them manually to the new location, and update the Exhibit paths as described below. If they are not under the default location and are on the same computer, you need do nothing.
As seen above, transferring to a new version is simpler if external Exhibits are located outside the version-specific default locations. For that reason a transfer to a new installation may be a good time to locate the Exhibits outside the default location.
If you have moved your external Exhibits to a new location you must update the paths to them stored with each Exhibit in your Project(s). There are several ways to do this. The simplest is to use File > Maintenance > Verify File Integrity command. After the "Are you sure?" prompt you will see the External Exhibits screen if there are external Exhibits in the Project:
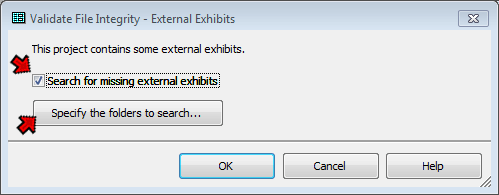
Check the box for "Search for missing external exhibits," then click the "Specify the folders to search..." button. In the screen that opens use the Add button to identify folders to be searched. If the exhibits are in sub-folders under a common folder, specify the common folder and click the "Search in subfolders" button to specify that subfolders of that folder are to be included.
To use this feature two conditions must be present:
- You cannot have Exhibit files with the same filename in different folders – only the first found will be used in each case.
- If you are moving to a new folder on the same computer, the previous location(s) cannot exist or TMG will not regard the exhibit as "missing." If this is the case temporarily re-name some part of the path to the old location(s) so the exhibits cannot be found there.
Repeated Requests for Unlock Code
After installing TMG on Windows 8 ro 10, or upgrading to Windows 10, they are often asked to enter the unlock code (serial number) even though they have done so before. This is caused by a change in a security feature introduced in Windows 8 and continued in Windows 10. The solution is as follows:
- When asked for the unlock code, do not enter it but instead close TMG.
- Right-click on the desktop shortcut for TMG, and choose "Run as Administrator" as shown below, and enter your administrator password if one is in use for your system:
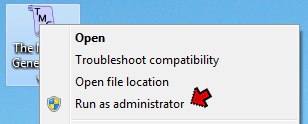
If your TMG shortcut is pinned to the Taskbar rather than being on the Desktop, you need to right-click on the shortcut, then right-click again on the name of the program in order to see the menu shown above.
- When TMG opens and you are prompted for the unlock code, enter it and the name and e-mail address you used when you purchased the current version of TMG.
- Close TMG, and then re-open normally. If you are asked again for the unlock code, enter it again. You should not be asked for the unlock code again after that.
The above procedure assumes that you are operating as a Windows user with administrator privileges. For most home uses that will be the case, though business systems are sometimes set up with most users not having these privileges.
This procedure only works after you have been prompted to enter the unlock code, including the very first time you open TMG after installing it on a system. Using it when you have not been prompted for the unlock code does not work.
For those interested in the technical reasons for this issue, it is something along these lines: When you are prompted for the unlock code, TMG writes it into the Windows registry. It tries to write it into a part of the registry where programs are not normally allowed to write while the program is open. Windows intercepts this attempt, and instead directs the entry into an area called "VirtualStore," where it functions normally. However, beginning with Windows 8, Windows periodically clears the VirtualStore, thus removing the unlock code. The next time you open TMG you are asked for it again. When you use the "run as administrator" method described above Windows does allow writing of the unlock code into the restricted area, where it is permanently stored.
Advanced Users
Advanced users can open Help, click on the Index tab, and find the topic "Data
File Storage." That article and the linked pages provide information about
some advanced options, including changing the system default locations. Methods described there allow you to move all the data and configuration files to alternate locations, which may be helpful in including them in a backup system.
Second Site Users
Users of Second Site, John Cardinal's program for creating websites from TMG data, must take some additional steps.
If you moving to a computer, install TMG before installing Second Site on the new computer. Consult Second Site Help for some helpful information.
When moving your TMG Project files to a new location, either on an existing computer or to a new one, Second Site needs to know the new location of your Project. Failure to update this information in Second Site may result in Second Site continuing to use your old Project, and you will soon wonder why the changes you make in TMG are not reflected in your website when you update it.
To update the Project information in Second Site, open that program and load the Site Definition File and go to the Data > Database section:
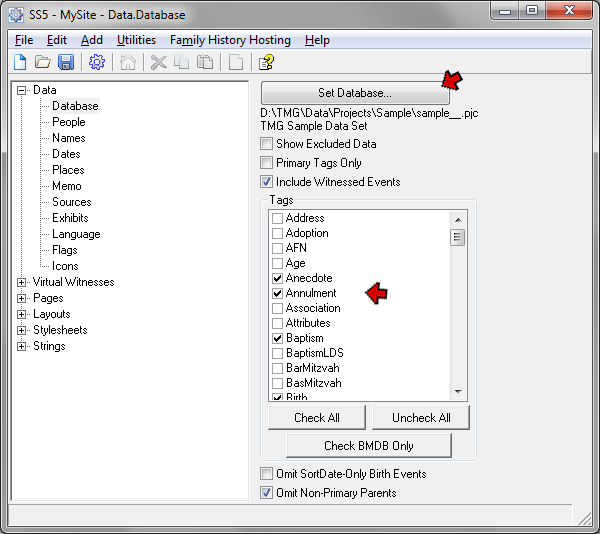
Click the Set Database button, and in the screen that opens navigate to the Project in its new location. If you have selected only specific Tag Types to be included in your site, you will need to select them again, because changing Projects resets the selection to all Tag Types.
If you have multiple Site Definition Files to create different websites, you will need to repeat this process for each one.
Copyright 2000-
by Terry Reigel


