This page updated 19 Apr 2013
Version note: Applies to Second Site 6 & 7
You can make your site even more interesting by adding customized maps. These are the same types of maps you commonly see on websites to provide location information for businesses and places of interest. They are great for illustrating migration paths, display the areas where the people in your site may have lived, or probably dozens of other uses I've not even considered.
This article describes some of the aspects of using this feature. An example of a set of five maps for a family group can be see on my Narrative family history site. Other articles in my Second Site Section cover other topics about customizing your site.
This article assumes the reader is familiar with the basic steps in creating a site with Second Site, as described in my Second Site Basics article, and managing Custom Pages, as described in my Second Site Overview article.
|
Topics Included in this Article |
|
| Creating a page on which the map will appear | |
| Providing the basic definitions of the map | |
| Locating and sizing your map | |
| Placing markers to call attention to specific points | |
| Adding lines to show migrations, etc. | |
| Marking areas with colored outlines | |
| In most cases you will need a code – they are currently free | |
| Adding cross-reference links from Person Page text | |
Second Site's Map feature uses the major online map services to generate the actual map. You choose the map service, and specify the beginning position, style, and zoom level when you create your site. If you wish, you can add markers, lines or colored areas on the map. While viewing the map the reader can change the position, zoom level, and map style if desired, as you may be familiar with if you have used websites that include such maps.
Maps may be included in sites posted on the Internet, or on sites distributed on CDs. The maps are accessed online when the reader views them, so if placed on sites on a CD the reader would need a live Internet connection to see them.
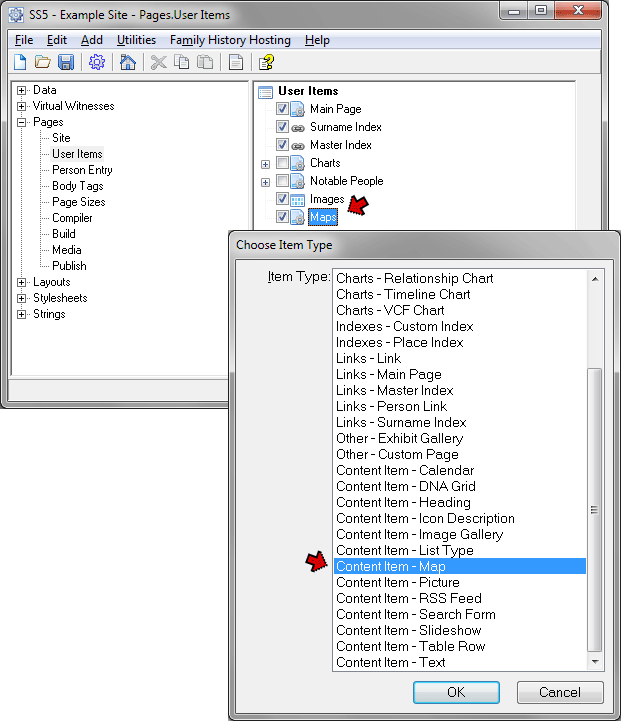
Maps are created in Second Site within a Custom Page User item. To set up a map, first create a Custom Page. Select that Custom Page, click the Add button, and on the Choose User Item Type screen, select the "Content Item - Map" item:
You can add a caption and text to the map itself, but you may want to add other text or content either in the Content fields of the Sub-Page, or by the use of other User Items. More details on working with User Items can be found in in my Second Site Overview article.
When you have created the Map Content Item, you see the Edit Map screen, where you define the general properties of the map:
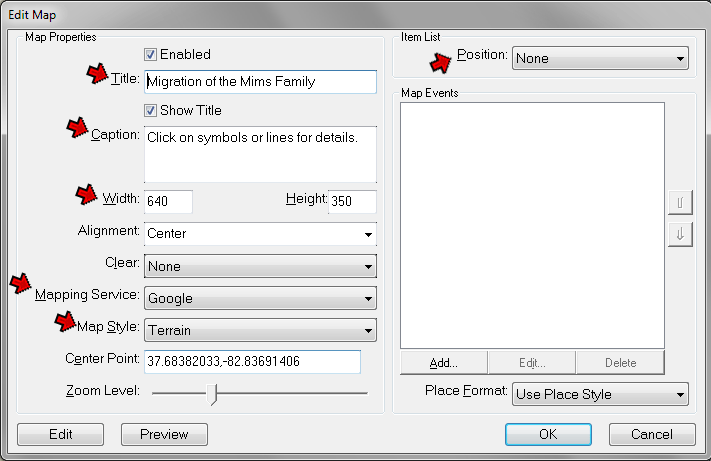
On that screen you will likely want to use the following fields:
Caption – enter an explanatory caption if you like, which will appear at the bottom of the map, within the box that encloses the map. Alternately, you may choose to add text on the Map Custom Page, which will place it outside the map box itself. If you add symbols or lines to the map (see below), I find it helpful to add a caption such as that shown in the screenshot above, since readers may not realize that additional information is associated with the various symbols and marks.
Width and Height – controls the overall size of the map on the page. The default values may work well, but if the default size or shape of the map does not work well for your application you can change these values. Keep in mind that readers may have lower resolution monitors than you do, so use caution not to make the map too large for comfortable viewing.
Mapping Service – at this writing, Second Site allows the use of two mapping services: Google Maps and Bing Maps (formerly Virtual Earth). Since the different services offer somewhat different styles of maps, and in some cases offer better coverage of specific areas, you may want to experiment with more than one service to see which result you like best.
Map Style – controls which style of map is displayed. There are four styles available, which are called Road, Aerial, Hybrid, and Terrain in Second Site. Not all styles are available from each service, and they sometimes use different name for their styles. The various styles are considerably different between the several services, so experiment to see which best suits your needs. I find that for historical maps I prefer the Terrain style on Google Maps, because the major features and political boundaries are shown without the clutter of modern roads.
You can set the Center Point and Zoom level on this screen if you know what values you want to use, but I find it is easier to set them with the Map Editor, as described next.
Next we adjust the parameters of the map to display the area we want readers to see when the map opens. We do that by setting the center and zoom level of the map, which can most easily be done with the Map Editor. Open it with the Preview and Edit button at the lower left of the Edit Map screen.
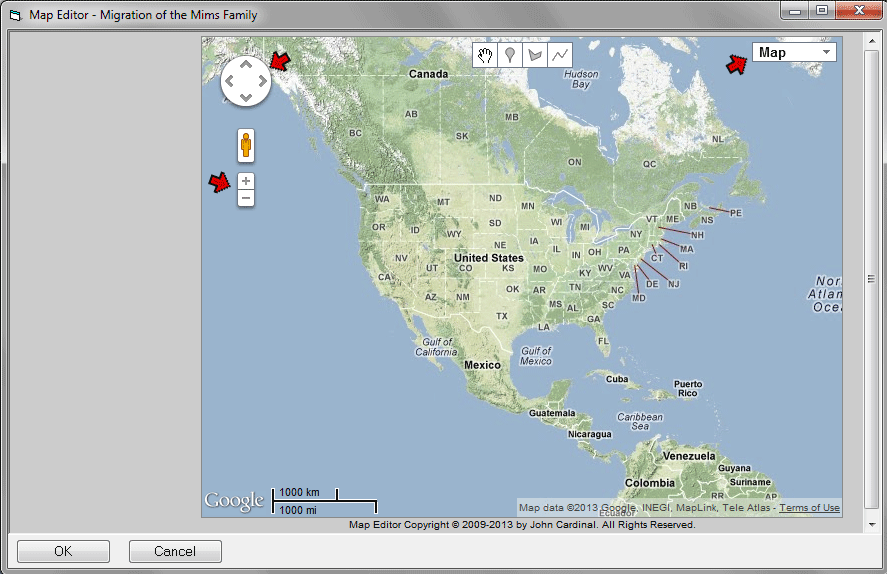
By default the Map Editor initially opens with the map centered on North America, and displaying the Map Style you have selected. If you have the Site Language set to a language other than English (US) it will open centered on the indicated country: the United Kingdom, Germany, French, Holland, or Norway.
You can change the Style with the drop-down at the upper right (remember that if you use a different Map Service that the style will likely be rendered differently than you see in the Editor).
You can change the center of the map by dragging it to a different location, or by use of the four arrow points at the top left of the map. You can change the zoom level by use of the + and - buttons.
Once you have the map positioned as you like, click the OK button to exit the Editor, and save your settings. When you do, the Map Style, Center Point, and Zoom level settings on the Edit Map screen will be changed to the values you set with the Editor.
There are two ways to add markers to your map; the Events method and the Manual method.
The Events Method uses events recorded in your TMG data to automatically place markers for the locations recorded in those Tags. Using this method requires that you enter coordinates in the LatLong field of each Tag you want to have represented by a map symbol.
To use this method, you click the Add button on the bottom of the Map Events box on the right side of the Edit Map screen. This Opens the Edit Map Events screen, which offers a number of tools to select the specific type of events you want to depict. You can use one or more of the three filters to limit the events that will be displayed:
Event Filter – allows you to include only specific types of events.
Person Filter – allows you to include only events associated with specific people. To use it, creating a custom Flag in TMG, and set it to a unique value for the people whose events you want to include.
You can also specify that a line will be drawn to connect the events you specify, which might be useful, for example, to depict migration paths.
I have not used this method, so I cannot provide further details on its use. I have found the Manual Method, described next, works well for the types of maps I've wanted to create, which are more general in nature and do not relate to very specific locations.
The Manual Method uses the Map Editor to manually locate markers on the map and add any desired notes. To use it, click on the Preview and Edit button to open Map Editor. Note that if you have previously set the centering, zoom level, and style, the Map Editor now opens using with those settings.
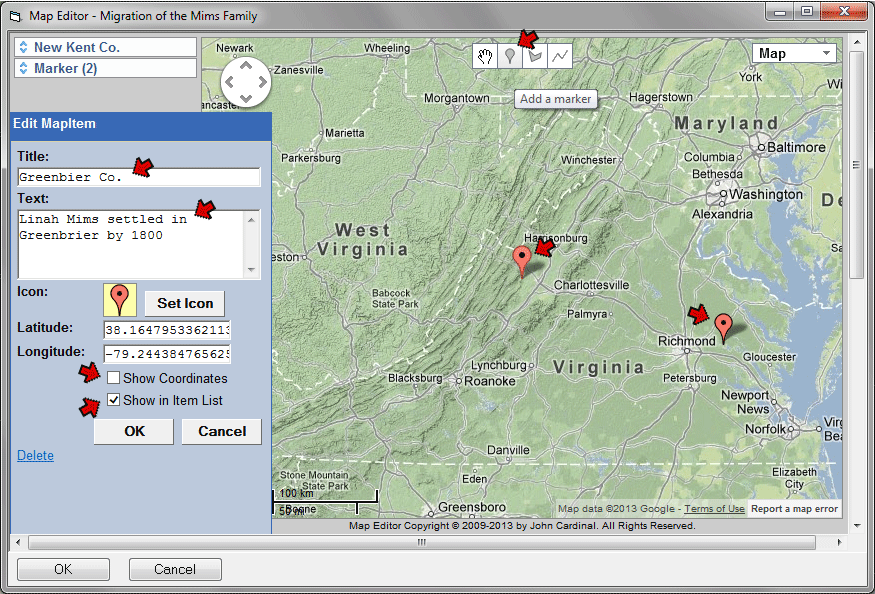
Markers are added in the map editor by clicking on the Marker button at the top center, then clicking at the spot where you want the marker to appear. Once the marker is placed, you can click on it and drag it to a different location if you like.
Here, I have added one maker near Richmond, and am now adding a second for Greenbrier County. After the marker is placed, click on the marker itself, or the label for it (here "Marker (2)") to open the Edit MapItem screen, as shown above. In that screen you may want to use these fields:
Title – enter a brief description of the item, which will appear when the reader holds the mouse cursor over the marker, and as a title in the text box that opens when the reader clicks on the marker.
Text – enter a a fuller description if you like, which will appear in a box that opens when the reader clicks the marker. This field accepts HTML coding, so you can enter HTML tags such a <strong>...</strong> for bold, or even links to Person Pages.
Show Coordinates – by default, this box is checked, and the coordinates appear in the text box that opens when the reader clicks on the marker. That can be helpful if you are marking a location which is precisely known, such as a tombstone, which the reader may want to locate with a GPS unit. But if the location is only approximately known, as in my case here, those coordinates seem to me to indicate you know more than you actually do. I uncheck this box in such cases.
When you have added your markers, re-center the map as desired and click OK to close the Editor and save the settings.
In addition to markers, you can also add lines to your map. These can be useful to show migrations and probably lots of other types of information. You can add lines with the Map Editor:
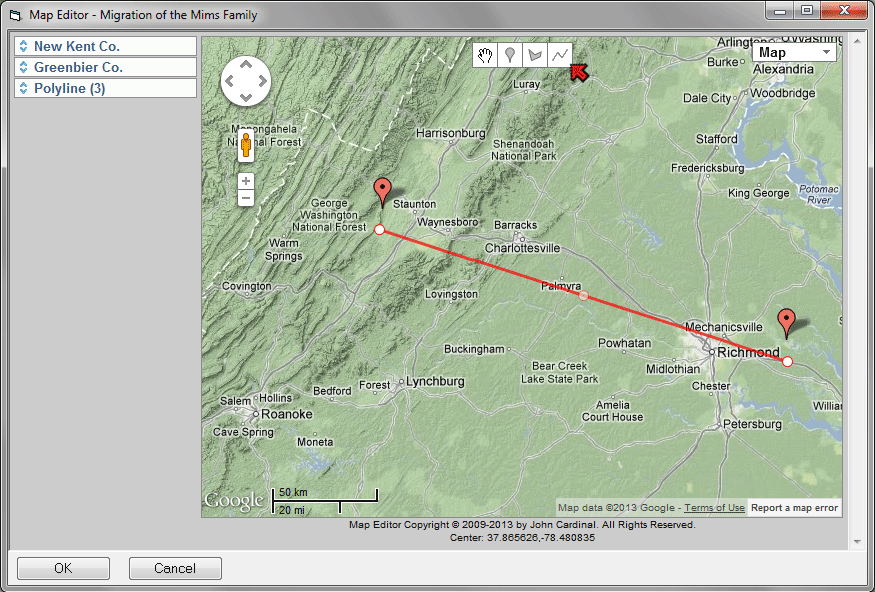
You add lines by clicking on the Lines button at the top center of the screen, then clicking on the beginning point, and then on each additional point you want to create. Double-click on the final point to terminate the line. While I only show a single segment line above, lines can have any number of segments.
After the line is drawn, you can move it my holding the cursor over it until the boxes appear as shown in the screen-shot above. Then click and drag the boxes to relocate the line. Note the shaded "ghost" box in the middle of the line above. If you click and drag it, it becomes a new point on the line, dividing the formerly straight segment into two new segments.
Like the marker points, you can add a Title and Text to lines, which will appear in a box that appears when the reader clicks on the line. Other controls on the Edit MapItem screen for lines allow you to change the width, color, and opacity of the line.
In some cases it is useful to mark areas with a colored area. For example, one might mark property owned by an ancestor, a county, state, or other area. This can be done with the Polygon feature in the Map Editor:
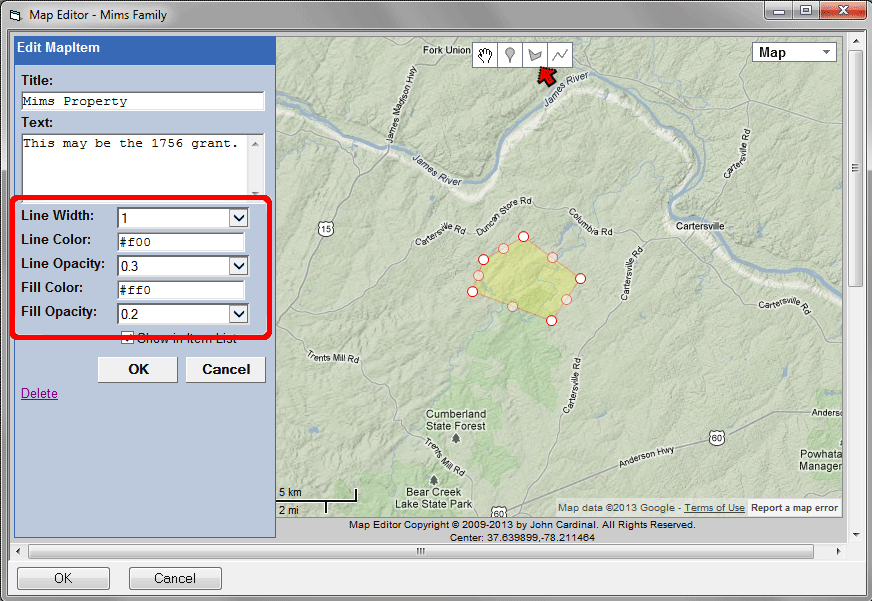
Colored areas are added by clicking the Polygon button at the upper left corner of the screen, then clicking at each corner of the desired polygon. Double-click at the last corner and the polygon will automatically close. After the polygon is added, you can move each line segment of the bounding line, and split segments into two parts, by clicking and dragging on the corner boxes that appear when you hover over the figure, as illustrated above for lines.
The Edit MapItem screen allows you to add a Title and descriptive Text, just as you can for the other items. You can also control the line width, and the color and opacity of both the outline and the fill color.
Some of the map services require that you obtain a code key in order to use their maps on a site hosted on a server. In some cases a code is required when the site is located on your own computer. The keys are long alpha-numeric codes, like the "unlock codes" used by software such as TMG and Second Site. Currently, all the codes are free, but obtaining them requires going to the service's website and filling out the necessary forms, then responding to an email message.
For details on obtaining the required codes for the services you want to use, open the Edit Map screen by double-clicking on the Sub-Page Map item, or by selecting it and clicking Add. Then press the F1 key to open Help for that item. Scroll down to the "Mapping Service" section and see the instructions in the box labeled "API Key Requirement."
Once you have obtained the key, copy it by copy and paste to the field for that service in the Pages > Site section.
You may want to provide links on the Person Page sections of selected people to a Map so that readers can easily find a map associated with the person. There are at least two ways to do that:
Creating a Maps Header – creates a section header in the Person Page entry for each person the map applies to. This method works well if the maps relate to the people in a general way. There are several ways to do this, but the best is probably by use of Flag Events, similar to the method I describe for creating a header for family background pages in my article on Flag Events. This method places a header like the "Charts" header that is produced when you have a person who is included in a chart. The person doesn't actually have to appear in any way in the Map, so this is useful if you want to provide a map of the area where a group of people lived without having to mark specific locations relating to each person on the map.
Embedding Links within the Text – creates a link within the text of the entry for an individual person. This works well if the map is related to a particular event or time period in the person's life. Since the link appears within the text it tends to associate the link to the Map page to specific events in the person's life. With this method you add Tags in TMG to the people who you want to link to the Map, as described in my Useful Tricks article.
The mapping feature adds utility to sites created with Second Site. Your maps can be as simple or as complex as you like. A simple map is quite easy to add to your site, and there are ample tools available if you want to spend the time on a more elaborate presentation.
| ReigelRidge Home | Terry's Tips Home | Contact Terry |
Copyright 2000- by Terry Reigel