This page updated 22 Jan 2012
Version note: Applies to TMG 8 & 9
One of TMG's better features, in my opinion, is the ability to apply Accents to color code persons with most any characteristic. A virtually endless set of conditions can be displayed by Accents. The names of persons marked appear in distinctive colors in the Details window, Children and Siblings windows, the Project Explorer, and the expanded version of the Picklist. You can choose both the text and background color for each Accent condition you define. You can save different sets of accents and recall them for later use.
Topics Included in this Article |
|
| What kind of conditions can be accented? | |
| How to enable and define Accents | |
| Terry's favorite Accent definition | |
| Adding buttons for Accents to the Toolbar | |
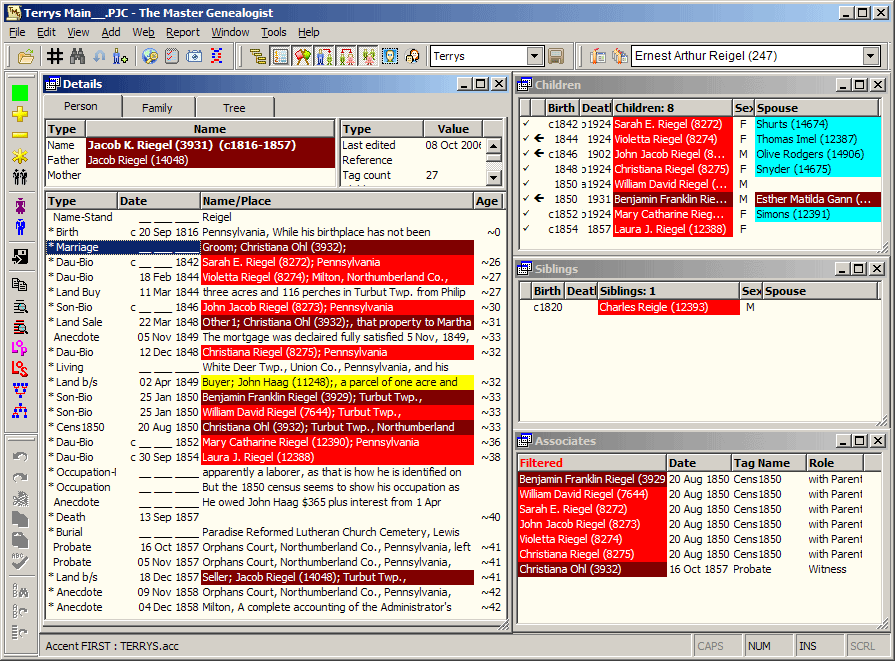
The screen shot below illustrates how accents can provide a quick display of how the people on screen are related to a base person, in this case, to me.
This article describes how Accents are turned on, offers some tips on their use, and suggests some useful Accent systems and how to create them. If you want to "Accent" Tags, rather then People, use the Tag Label Color feature, described in my article on Customizing Your Workspace.
Accents can be based on Flags (see my article on Flags for more information), or on any of over 1400 filter conditions. The filters include such conditions as the number of various types of Tags; the contents of the Date, Place, or other fields in various tags; the name of a parent or sibling; or whether the person is an ancestor or descendant of someone; to cite some examples. The Flags used can be standard Flags, like Sex or Living, or any custom Flag you might create. By creating and using custom Flags quite complex Accent systems can be defined, as illustrated in the system I use, which is described below.
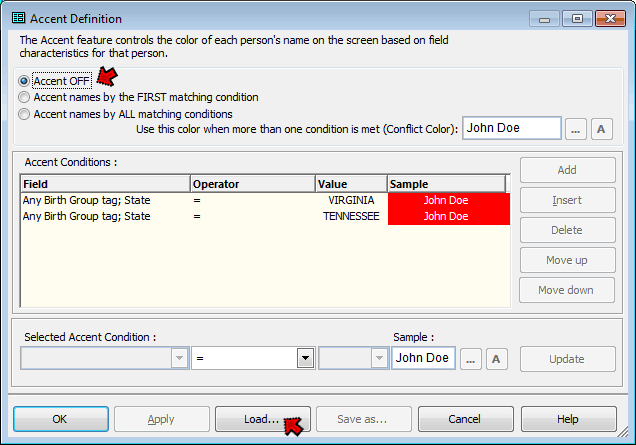
TMG ships with a few sample Accent conditions defined. They are:
These examples illustrate several useful techniques for controlling Accents. The first two use Flags to control the Accent condition. The last two use filters, Father "Is Not Known" and Mother "Is Not Known" for the End of Line Ancestors Accent, and "Any Birth Group tag; State" = Virginia and "Any Birth Group tag; State" = Tennessee for the other. The End of Line Ancestors example illustrates an Accent definition requiring all conditions to be met, while the others use only the first condition met. The colors used demonstrate various combinations of text and background colors.
You turn on Accents from the Accent Definition screen. You access that screen by one of the following:
You turn on Accents by selecting the second or third option at the top of the screen, instead of "Accent OFF." Generally the second option – First matching condition – is best. It is somewhat quicker when you change focus to a new person as TMG can stop searching once it finds a condition that matches those specified. And generally it provides the desired result, as described in my Example, below.
You can use an existing Accent definition, including the samples described above, by clicking the Load... button at the bottom of the screen, and selecting one of the defined Accent files in the dialog box that opens. It may be helpful to Load each of the sample conditions and examine how they are defined to understand some of the methods available.
To create a new Accent definition:
Help offers detailed description of each of the controls – click the Help button to open the correct Help page.
Use the Apply button to apply your accents without closing the Accent Definition screen, or OK to exit the screen and apply the definition. If you might want to use the definition again later, you can give it a name and save it by clicking the Save as... button. If you save the definition, the name you use will appear in the status bar when this definition is in use.
When you close TMG, the Accent condition in use, if any, will be applied next time you open the program.
When you define Accents based on filters, such as "Is an Ancestor of" some person, TMG must re-compute the filter every time you change focus from one person to another. Depending on the specific filter used, the size of your Project, and the power of your computer system, this may result in an undesirable delay. By contrast, Accents based on Flags are much faster – TMG only has to look at the predefined Flag values for that one person.
The filters are fine for quickly creating an Accent definition. But for Accent definitions you use often, consider creating custom Flags, as described below, especially if you find filter-based Accents are degrading your system's performance.
Users have developed a wide variety of Accent definitions, some for a special analysis, and others that they use most of the time to easily identify people with certain characteristics. Common examples are Accents to mark persons not yet "cleaned up" after import or a change in personal data entry practices, and any of a number of systems to show how persons are related to the user or other persons. The Accent system I use is a combination of several of these ideas.
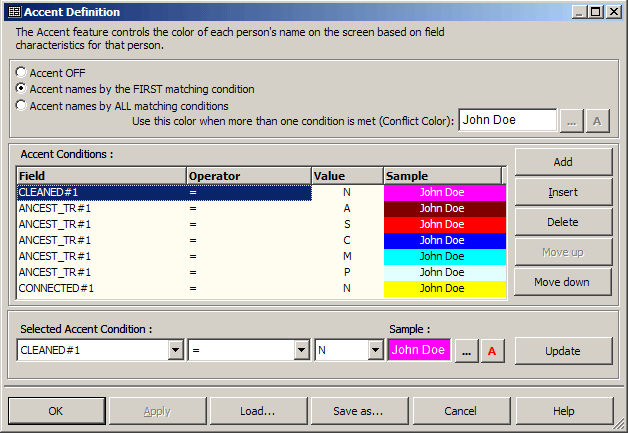
My Accent definition has three different parts, each based on a different custom Flag:
The screen shot below shows the Accent definition I use for my family.
Users who create several Accent Definitions for common use, such as I do for me and my wife, may want an easy way to change from one to another definition. The best way I've found is to add a button to the custom Toolbar to turn on each accent. Details of how to do that are discussed in my article on Using Toolbars.
| ReigelRidge Home | Terry's Tips Home | Contact Terry |
Copyright 2000- by Terry Reigel