 This article describes the basics of creating simple Templates to extract data from the data fields and assemble it in the desired form.
This page created 6 Aug 2022
This article describes the steps in creating simple Templates in Online Repository Assistant (ORA). Other articles in my ORA Section cover more specific topics about using the software.
|
Topics Included in this Article |
|
| Home of all Templates | |
| The basic building blocks of Templates | |
| How to create a basic Template | |
| Verifying that a Template works as intended | |
| Changing the way data from a field is output | |
| Copying Templates to other Collections, or to share with others | |
| Making Backups to secure your Templates and other settings | |
| Placing output of Text Templates at top of the OraPanel | |
| Additional comments and links on Templates | |
ORA offers the use of Templates to manipulate the data collected and displayed in the OraPanel. The Templates can extract data from one or more data fields. That data can be reformatted, and can be combined with plain text to provide the desired output. The manipulated data can then be pasted into your genealogy program, either with a manual copy and paste operation, or automatically with ORA's Auto Type feature.
This article describes the basics of creating simple Templates to extract data from the data fields and assemble it in the desired form.
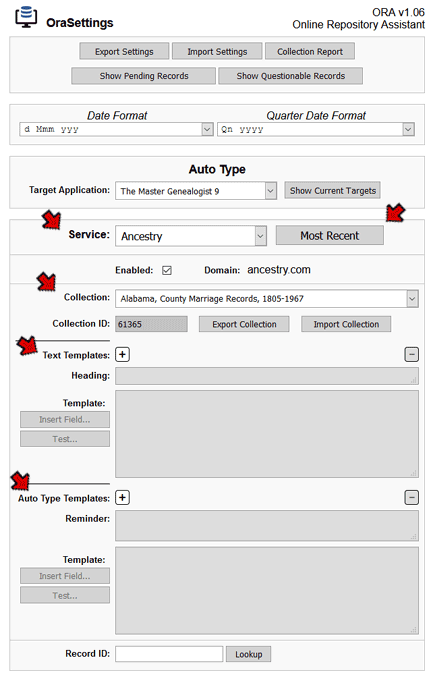
ORA Templates are entered on the OraSettings page in your browser, as illustrated on the right. It is opened by clicking the ORA icon – ![]() – in the toolbar at the top of the browser.
– in the toolbar at the top of the browser.
We need to observe several points that are visible in this screenshot.
ORA will recognize a collection once you have visited a record in that collection. If you have the OraSettings window open when you first visit a collection you can use the browser's Refresh button to refresh the OraSettings windows, click the Most Recent button to make that collection the current one.
For the rest of this article we will discuss only Text Templates, which are generally simpler to set up. All the methods described here apply to Auto Type Templates as well, but they have some additional features which are discussed in my article on Auto Type Templates.
Templates are a sort of "maps" that tell ORA how to construct a desired output text. They are similar to the template systems used by Family Historian, Legacy, RootsMagic, and TMG for creating sentences and source footnotes, so they will likely be familiar to users who have used those features of their genealogy program.
ORA Templates consist of three elements:
| Variable | Sample Output |
| [County] | Washington |
| Variable | Sample Output |
| [County] Co. | Washington Co. |
| Variable | Sample Output |
| <[County] Co.,> [State] | Washington Co., Virginia |
| <[County] Co.,> [State] | Virginia |
In this example, the first output is produced if there is a field named "County" and it contains data, and the second if there is not. Notice that not only the output from the "County" Variable does not appear in the second case, but the literal text within the angle brackets is also omitted.
Text Templates are entered in the field in the center of the OraSettings window. To illustrate this we will create a Template designed to output the age of a person as recorded in a census record, together with some literal text.
 To create this Template we open the OraSettings window, and look at the middle section of it, as shown in the illustration on the right.
When I cite census data for a birth event in my genealogy program I like to record in the detail area of the citation how the source supports what I have entered. Since I enter a date, but the source only shows the person's age, I record the age as shown in the source. Since I typically record the state in the birth record, I record in the citation only that the state was shown in the source (unless it's different than what I enter). The Template illustrated here creates the text I would copy and paste into the detail field of my citation entry.
First, we verify that it is set to the Service and Collection we intend the Template to be used for.
Next, we click the [ + ] button next to the Text Templates label to create a new Template. A button with a number appears, highlighted in color, and the Heading and Template fields are enabled. You can create any number of Text Templates. To edit an existing Template just click on the number of the one you want to edit and it will become colored to indicate it is active.
When adding a Template for a Collection that already has one or more Templates, the new Template is by default placed after the last existing one. To place it elsewhere, first select the Template button you want the new Template to come before, and hold the "Alt" key as you click the [ + ] button.
Next, enter a Heading. The Heading becomes the label for this Template. It will appear at the bottom of the OraPanel next to the output of the Template, or if the output is very long, in a black bar above it. If you fail to enter a Heading the default label will be "Text Template n" where "n" is the number of the Template.
 Next we enter the Template itself. We type in the literal text that we want to appear. We could also type in the Variable, typing the label of the field from the OraPanel within square brackets. Or, to avoid any typing errors we can use the "Insert Field..." button marked with the red arrow in the illustration above.
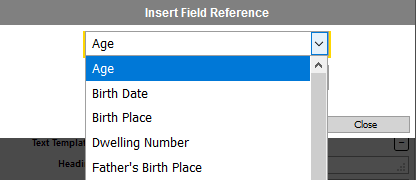
To use this button, place the cursor at the place in the Template where the Variable is to be inserted, then click the button. You are first asked whether you want to insert the Variable alone, within Conditional brackets, or with an accompanying label. After you make that choice a list of Variables available for that Collection appears in a drop-down list, as shown in the illustration on the right.
When typing in Variable names by referring to the field names in the OraPanel, note that for fields in sections labeled "Source" or "Page," the field name must be prefixed by that label followed by a period – for example Variable for the "Year" field in the Source section of a census record would be [Source.Year]
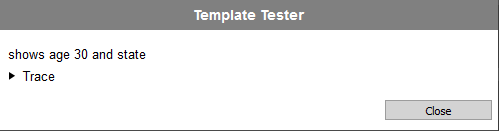 We are now ready to test our Template. The easiest way to do that is to click the Test button on the ORA Setting window, which is below the Insert Field button as shown in the illustration above. When you do, a Template Tester dialog opens, as shown on the right, that shows either the output of the Template, or an error message if it contains an "illegal" construction.
If you currently have a record that is part of the Collection open in your browser the output displayed in the Tester dialog is based on that record. ORA keeps track of each Collection you have visited, and if you do not currently have a record open the Tester display will be based on the last record you had open in that Collection. This makes it possible to work with Collections you have visited in the past but do not currently have open.
If you want to test your Template with different data than what is in the current record you can search for a record that contains the data you want to test with. Alternatively, the Assignment Variable, described in my Intermediate Template Methods article, allows you to temporarily change the values in the fields used by the Template to test with alternate data.
The Trace button in the Tester dialog opens a window that shows the logic used by the Tester to display the current results. This can be helpful in resolving issues when the display is not as expected. However the list of logic steps is very detailed and may not be useful to many users.
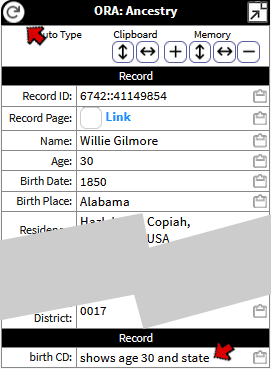 We can also test a Text Template by viewing its output in the OraPanel in the window where we are viewing the record for this collection. If that page is already displayed in our browser, we need to click the "refresh" icon at the top left corner of the OraPanel to have it display our new Template. The output of the Template appears at the bottom of the OraPanel, as seen in the illustration on the right.
To use the text displayed there we click the small "clipboard" icon on the right side of it, then paste it in the data entry screen in our genealogy program where we want it to be entered.
Using the methods described thus far we can combine the data from one or more fields from the record with bits of literal text to produce segments of text ready to copy and paste into our genealogy program. But these methods are limited to using data from the various fields as they have been collected by ORA and displayed in the OraPanel.
What if we want the data to be presented in a different format than it appears in the OraPanel? For example, we may want a date to be in a different format. Or the place may be shown in the record as the name of the city, county, and state, separated by commas, while we want to use only part of that field. Or the name of a state may be displayed spelled out and we want to have it appear as a two-letter postal code, or the reverse.
ORA offers an extensive set of Transforms to change the way data from a field is output by a Template.
Transforms are entered inside the square brackets that enclose the name of the Variable, following the name and separated by a colon. The general format is:
[Variable:Transform]Some Transforms have parameters that control exactly how they work. For a Transform with parameters the general format is:
[Variable:Transform:parameter1:parameter2]For a description of what, in my opinion, are the most useful of the large number of Transforms offered by ORA, see my article on Transforms.
 As mentioned before, all Templates are specific to a given Service and Collection. This allows Templates to use the field names that appear in each Collection and provide output that is useful for the data from each different Collection. However, it is likely that once you start creating Templates, you will find that you want to reuse Templates you created for one Collection for other similar Collections.
Unfortunately, ORA has no way to know which collections you may consider to be similar, and no way to know that a field in one Collection may mean the same as a field with a different name in another Collection. ORA does however provide tools to help you copy the Templates for one Collection to another Collection. After copying, you can make any necessary edits as required for the new Collection.
The Export Collection button, as illustrated on the right, will save the Templates for the current Collection, either to a file or to your clipboard. Note that the Export Collection function exports all Templates that exist for that Collection, both Text Templates and Auto Type Templates. You cannot export individual Templates.
ORA offers three ways to export the current Collection:
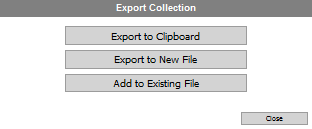 You choose which way the Templates will be exported in the dialog box that opens when you click the Export Collection button, as illustrated on the left.
You import saved Templates by setting the Service and Collection to the Collection you want to import into, and clicking the Import Collection button. You are offered a choice of using the Templates saved to the clipboard (if any) or those in a file. If you choose a file, a standard File Open dialog opens, from which you can choose the file.
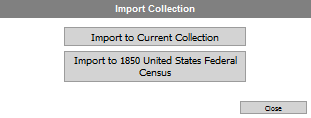 With either choice, Import Collection dialog, illustrated on the right, will offer two choices. You can import the Templates into the current Collection, or the one from which it was originally saved. You would choose the Current Collection if you are using this feature to copy Templates from one Collection to another one. You would probably choose the other option if you were restoring Templates for a Collection to some you had created earlier, or if you were importing Templates from another user.
Remember that Import Collection replaces all the Templates for that Collection, both Text Templates and Auto Type Templates, with those from the clipboard or file. Any Templates already existing for that Collection, even if there were more Templates than in the clipboard or file, will be destroyed. You cannot import only specific Templates from a Collection.
 It is wise to create backup copies of your Templates, Record Status data, and other settings. This data can be lost if the ORA extension is removed from your browser, or if you have a more general loss of data on your computer. Backups are made by clicking the Export Settings button at the top of the OraSettings window in your browser, as illustrated on the right.
Needless to say, you need to be sure the folder where that file is saved is part of your backup plan for all your data. For suggestions on how to create a backup plan for all your data if you don't have one, see my article on Protecting your Data.
To restore your data, use the Import Settings button, as seen in the illustration, and select the backup file you want to use. Be aware that the Import Settings process copies the Record Status data and Templates from the file, replacing any data already existing for the same Collections. So if you have made any changes to Status data or modified any Templates for Collections which have entries in the backup file since making the backup, it will be replaced with the older Status or Templates.
The Export and Import Settings feature is a good way to transfer this information to a new computer, or to a new browser. Be aware that if you use more than one browser, using this feature to transfer between browsers will overwrite the data on the same Collections from one browser over that from the other.
 By default, the output of your Text Templates is placed at the bottom of the OraPanel. For records with many fields displayed you may have to scroll the screen to find the fields you have created with Templates.
Your Template fields can be placed at the top of the list of fields in the OraPanel by checking the "Add Fields at Top box in the Template Options section of the OraSettings screen, as shown in the screenshot above.
ORA's Templates offer powerful tools to reduce the effort needed to transfer data from online genealogical services to you genealogy program. This article covers only the basics of employing these tools. For more information I suggest the following:
| ReigelRidge Home | Terry's Tips Home | Contact Terry |
Copyright 2000- by Terry Reigel