This page created 29 Feb 2010
Version note: Applies to TMG 8 & 9
This article describes how to download and install the macro I have created for Microsoft Word 2007 to edit Journal reports created in TMG. Instructions are also provided to make minor edits in the macro to adjust it for your needs.
Topics Included in this Article |
|
| A description of the functions of the macro | |
| Downloading the macro from my website | |
| Installing the macro in Word | |
| Inserting your name, and other adjustments to the macro | |
Those who would like to make significant changes to the functions of the macro are probably best served by recording their own macro. My article on Recording Macros in Word 2007 describes how to do that. Readers using a version of older than Word 2007 please see my article for Word97.
Using my macro is a three-step process. The macro is contained in a Word document, which you down load to your computer. You then open that document and transfer the macro to your Word installation. Finally, you make any edits you may choose to the macro, which should at least include inserting your own name so the footers of the reports will carry your name. Those steps are described in detail in the sections below.
This macro performs the following formatting changes to Journal reports created with TMG, when they are output in Microsoft Word file format:
Sets margins, and spacing of footer from bottom of page.
Underlines the "Generation xxxx" headings, and removes a blank line after each heading.
Remove blank lines TMG inserts immediately before and after the report title.
Creates a footer with a graphic line above, author's name left, page number centered, date on the right, and with a 9 pt. font.
Reformats endnotes into two columns and adjusts the spacing between notes.
For details of the specific margins, font sizes, etc., see the step-by-step instructions used to create the macro in my article on Recording a Word Macro. In order for the macro to work correctly, the reports created in TMG must meet the following specifications:
Must be a Journal report. A macro could easily accomodate other report formats, but this macro adjusts the formatting of the "Generation" labels that are part of the Journal, and will fail if those labels are not present.
Have the Report Definition set to produce Endnotes, since some of the applied formatting is to the Endnotes section of the report.
Have the Report Definition set to not produce footers, since the macro creates its own footers and will produce unpredictable results if footers are already present in the report.
Obligatory Disclaimer
While I have every reason to believe this macro is safe to use, I cannot accept liability for any adverse consequences. In this litigious world I have to state that it as provided "as is." By downloading it you agree that I am not liable should there be any ill effect whatsoever from downloading or using it. |
My macro for formatting TMG Journal reports is contained in a Word document, which can be downloaded here. Save it to any convenient place, such as your desktop.
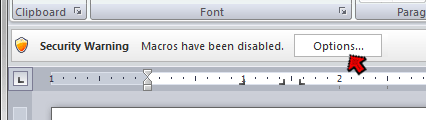
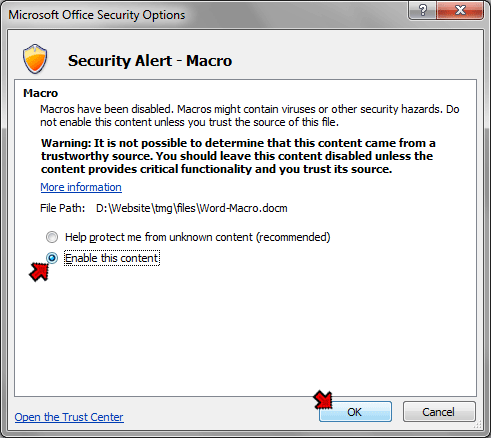
After you have downloaded the Word document containing the macro, the macro has to be installed into your copy of Word before it can be used. That is done with the following steps.
In that dialog box, select "Enable this content" and click OK to proceed with the following steps.
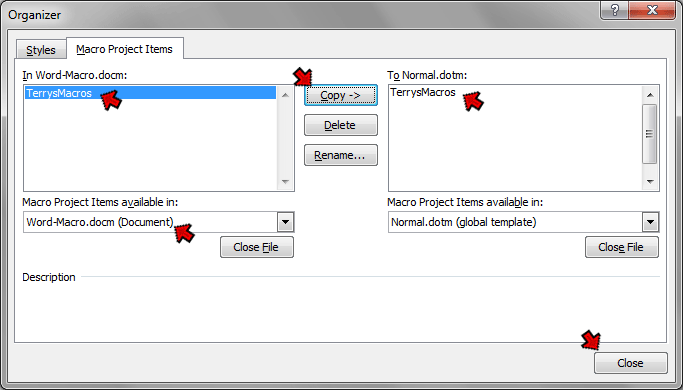
Close Word, and when prompted that changes have been made that affect the global template, do you want to save them, click Yes (the changes are that the macro is being saved to your normal template). You may not get this prompt if other copies of Word are open.
To conveniently use the macro, you need to attach it to a button on the Quick Access toolbar, or assign a keystroke combination to it. To do that, open Word again, to a blank document. Click the Office "orb" at the upper left corner, and at the bottom of the menu click Word Options to open the Word Options dialog box.
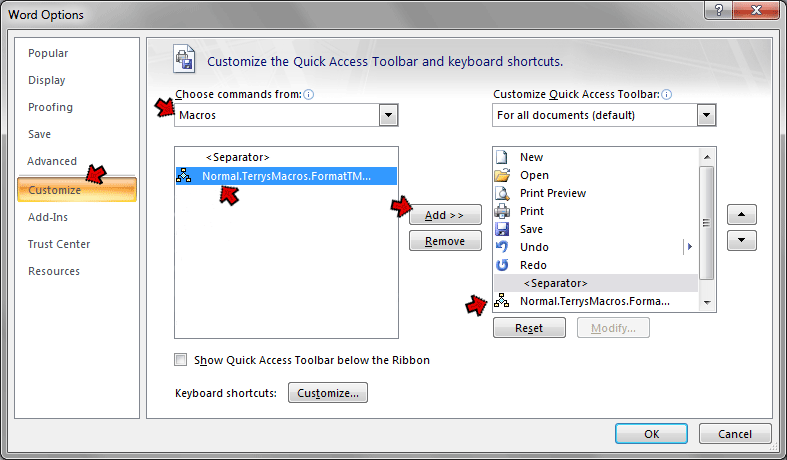
If you want a different button icon than the default one shown, select the macro in the list on the right, and click the Modify button below (dimmed in the screenshot above because the macro is not selected in that list). In the Modify Button dialog that opens select a suitable button image. Click OK until all the dialog boxes are closed.
The macro is now installed in your copy of Word, but we still have one step left to make it useful – making at least one edit to it; more if you prefer.
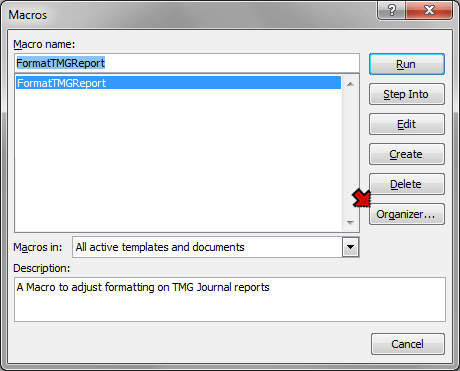
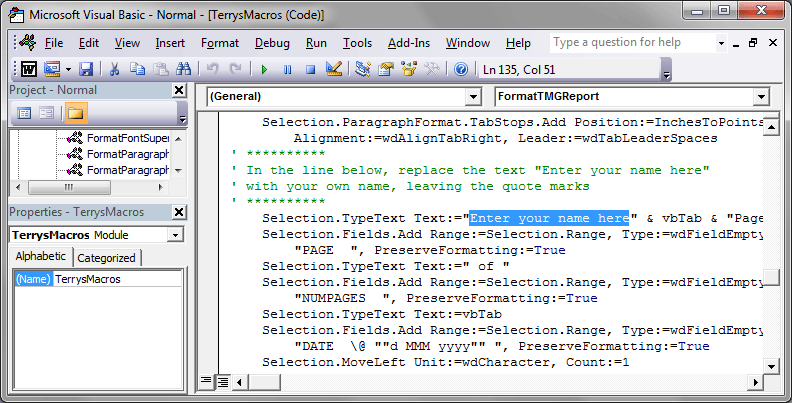
Before it can be used, at least one edit to the macro is needed - inserting your name so that it appears in the footers of reports. To do that, follow the steps below:
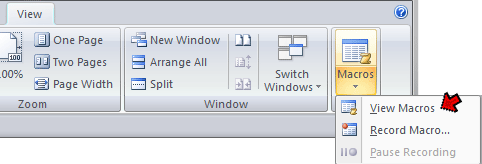
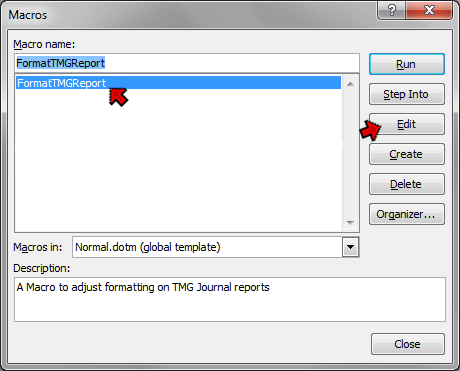
On the View ribbon, in the Macros section at the far right, click the Macros button with the small down arrow on it, and select View Macros as you did in Step 2 in "Installing the Macro," above, to open the Macros dialog box.
Other edits to the macro are quite possible, for example changes to the margins, font sizes, and similar parameters included, or even deleting entire functions in the macro. Making such changes requires finding the places where they are specified in the macro code and making the required edits. That task may be made somewhat easier by referring to the step-by-step instructions used to create the macro in my article on Recording a Word Macro. As an aid in locating specific sections I have entered comments into the macro code showing where code associated with each of the section headers in that article starts. However, making significant changes by editing the macro is daunting. It may well be easier to record you own macro with the features you want, as described in that article.
| ReigelRidge Home | Terry's Tips Home | Contact Terry |
Copyright 2000- by Terry Reigel